Table of Contents
Background Info
Once you are all set you can try to setup your first campaign using the setup wizard. LUCY provides you with an alternative option using the expert setup mode.
How to Create a campaign by enabling the Expert Setup
STEP 1 - Create a New Campaign:
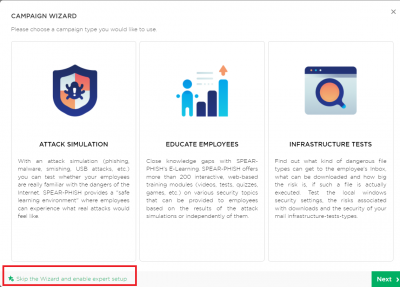
You can create a phishing campaign by pressing the button New Campaign. This will start Campaign Wizard.
STEP 2 - Select Expert Setup (Manual Configuration):
At the bottom of the Campaign Wizard window, choose the Skip the wizard and enable the expert setup.
Base Settings
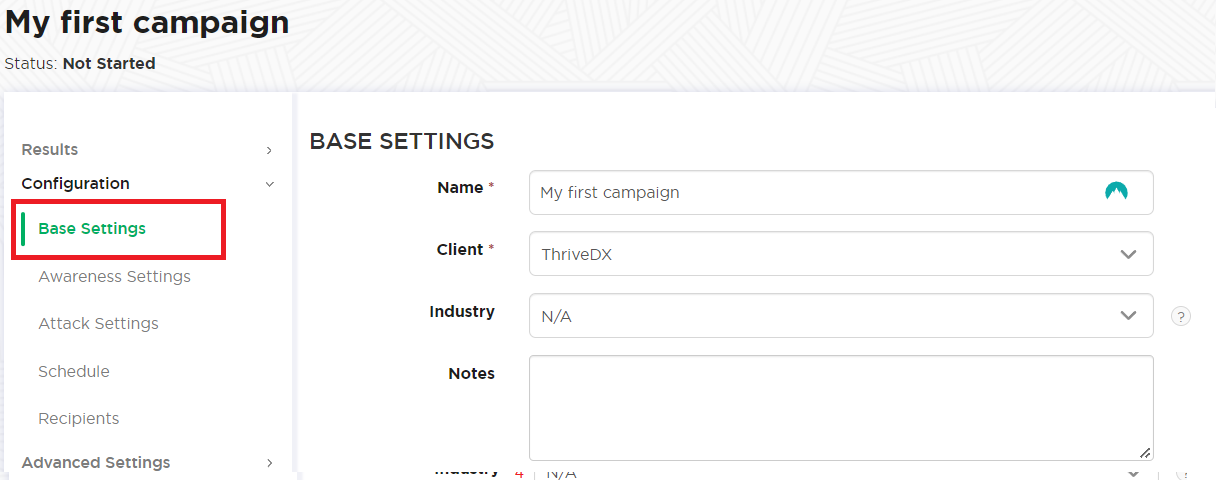
Every campaign has some Basic Settings which do not relate to a specific scenario template. Those basic settings can be found at a later point in the according menu to the left:
STEP 3 - Configure the Base Settings of Your Campaign
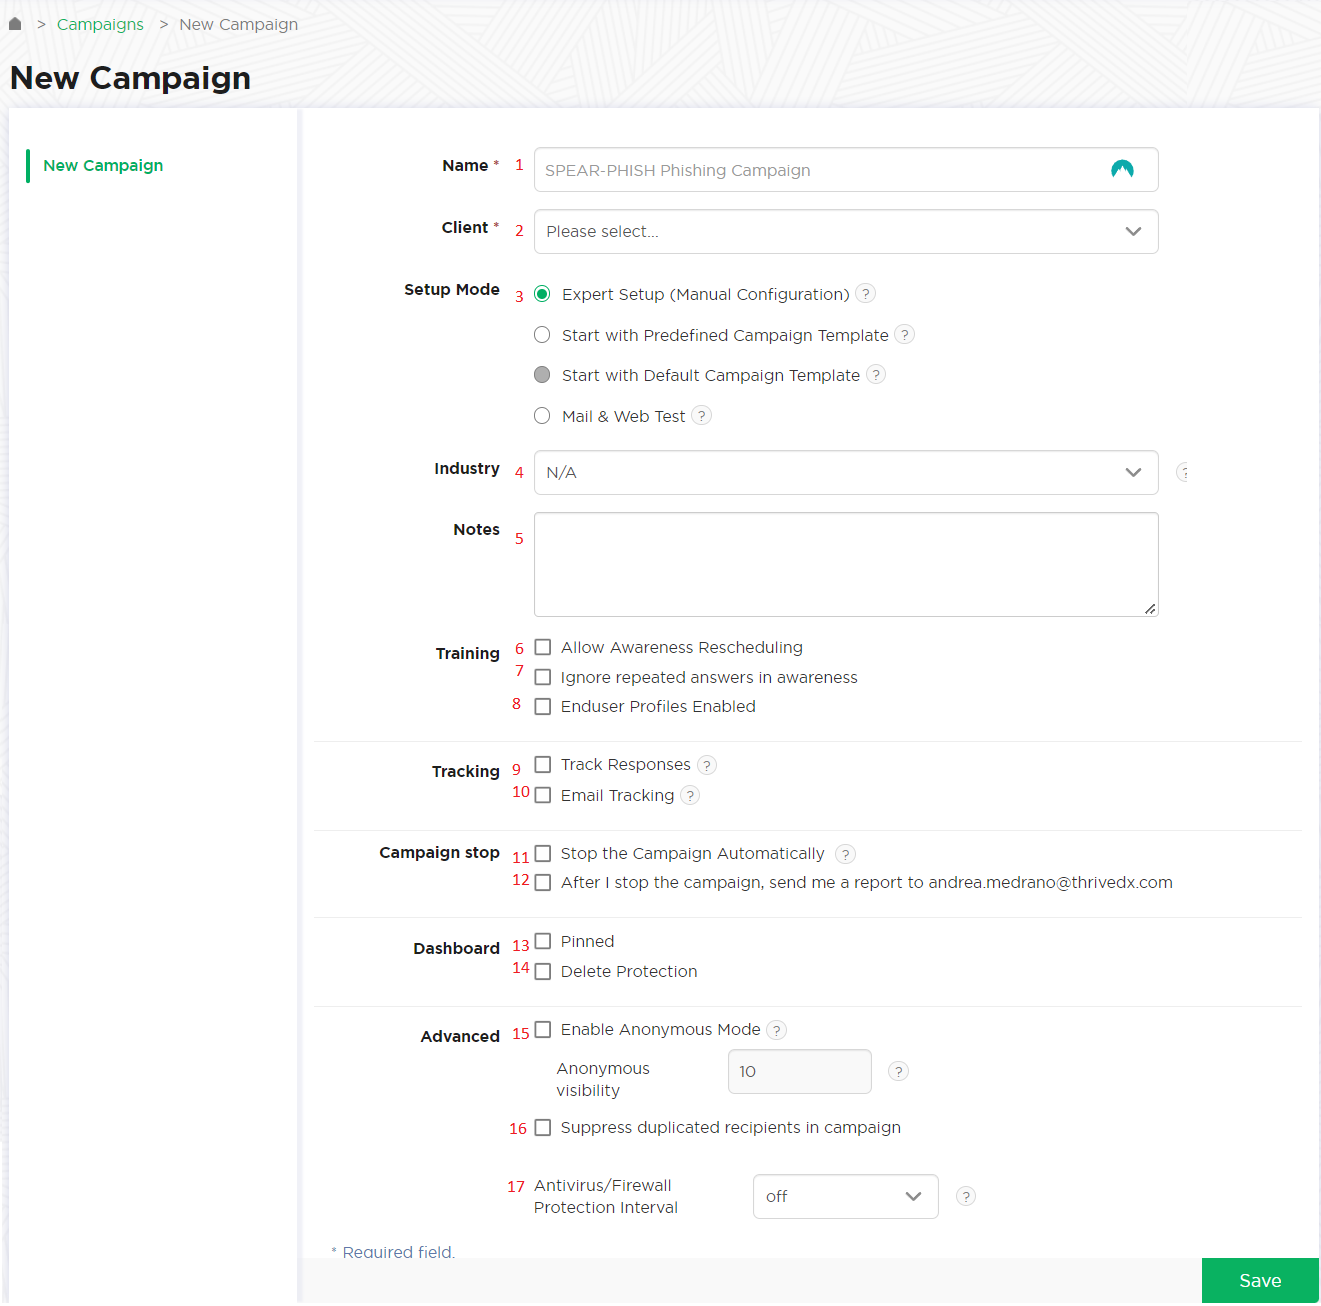
The following settings can be configured:
| Number | Description | Mandatory? | WIKI link |
|---|---|---|---|
| 1 | Campaign Name: Give your campaign a name. This name will be displayed on the main dashboard. | Yes | Monitor a campaign |
| 2 | Client: Create a client or choose the built-in client (a client can be your own organization or the company that asked you to perform a phishing test). This is important because you can also create view only accounts which are associated with those clients. | Yes | Create a Client |
| 3 | Setup Mode: As you are using the expert setup, please make sure you also selected Expert Setup (Manual Configuration) mode in this menu. You have different setup options like the Start with Default Campaign Template, Start with Predefined Campaign Template (called sample campaign in LUCY < 3.0). or Mail & Web Test. | Yes | - |
| 4 | Industry: Please select the industry type for the organization. This is an optional setting. It will allow Benchmarks | No | - |
| 5 | Notes: Internal notes for you or other campaign admins | No | - |
| 6 | Awareness Re-Scheduling: The recipient will be able to re-schedule awareness training. He/She will be able to define a new time/date. On that specified date/time the system will re-send the awareness email | No | - |
| 7 | Ignore Repeated Answers in Awareness: If you added an awareness training, you may specify that only the first answer to an exam or quiz gets recorded and repeated answers will be ignored | No | - |
| 8 | End-User Profiles: Users might not have time to finish an awareness course right away. They have the ability to re-schedule the training. But you have also the ability to create a login page for your end users where they can login and access their custom training links at any time, without the need to re-send an awareness mail. | No | End User Profile Page |
| 9 | Track responses: For accurate statistics, Lucy has the functionality to work with emails that came in response to a phishing email. Thus, you can determine which of the recipients did not actually receive the e-mail(for example email was not delivered and Lucy received a response from the mail server) or do not include the auto-responses in the statistics. | No | Track responses |
| 10 | E-Mail Tracking: You may use this feature to track if a campaign is functional and working as expected (e.g if mails arrive, the landing page works as expected etc.). With this feature, the system will periodically send emails to a test address, while the campaign is running. That will help you to make sure that the attack is executing correctly | No | E-Mail Tracking |
| 11 | Stop the campaign automatically: if enabled, the campaign will stop on the specified date. No more E-mails will be sent out. Campaigns with landing pages won't be accessible anymore | No | Start/Stop a campaign |
| 12 | Send a report when you stop the campaign: if enabled, the system will send you a report automatically. Please make sure you configured the according report template | No | Create a report template |
| 13 | Pinned: “Pinned campaigns” are used to group different campaigns within a view, similar to browser favorites. As soon as you have activated the checkbox “pinned” within the campaign, the campaign will appear on the dashboard within the according frame. | No | Pinned Campaigns |
| 14 | Delete protection: The system will keep a backup of the campaign in the system. If the campaign accidentally gets deleted, the support team will be able to restore it. | No | - |
| 15 | Enable Anonymous Mode: Use this mode to hide all victim data from statistics and reports. | No | - |
| 16 | Suppress duplicated recipients in campaign: Lucy checks if there are emails from the new group who are already included as recipients in the campaign and disables the creation of new recipients in the campaign for those whose emails are already in the campaign. To do this just remove checks from such recipients. | No | - |
| 17 | Antivirus / Firewall Protection: Sometimes a remote Firewall, Spam filter, or Virus Filter might automatically scan all the URL's within a link. As a result, you end up with false positives and LUCY will show all link clicked (phished). To avoid such automatic link requests by some 3rd party application you can enable the antivirus/firewall protection and LUCY will ignore all* GET requests for the first 30 or 60 seconds | No | Firewall Protection |
STEP 4 - Select one or multiple Scenario(s)
Now you need to select one or multiple scenarios. A scenario can be:
- a) An attack simulation scenario
- b) An Awareness training
- c) A technical test like LHFC
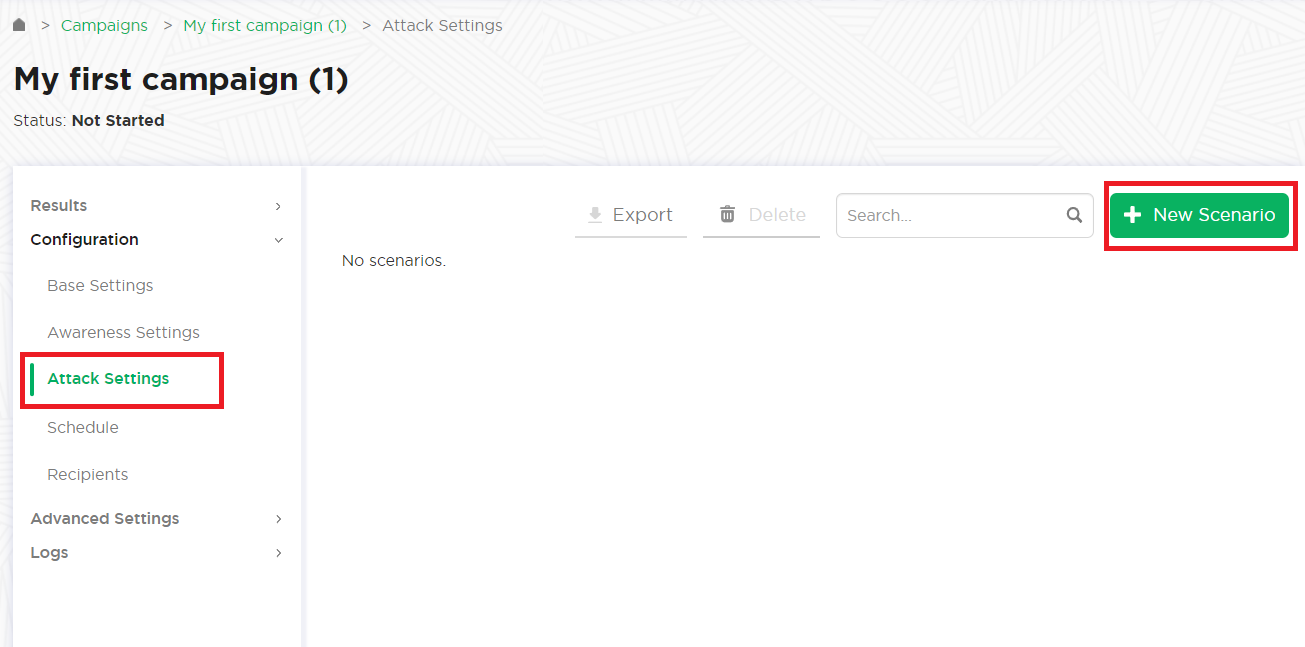
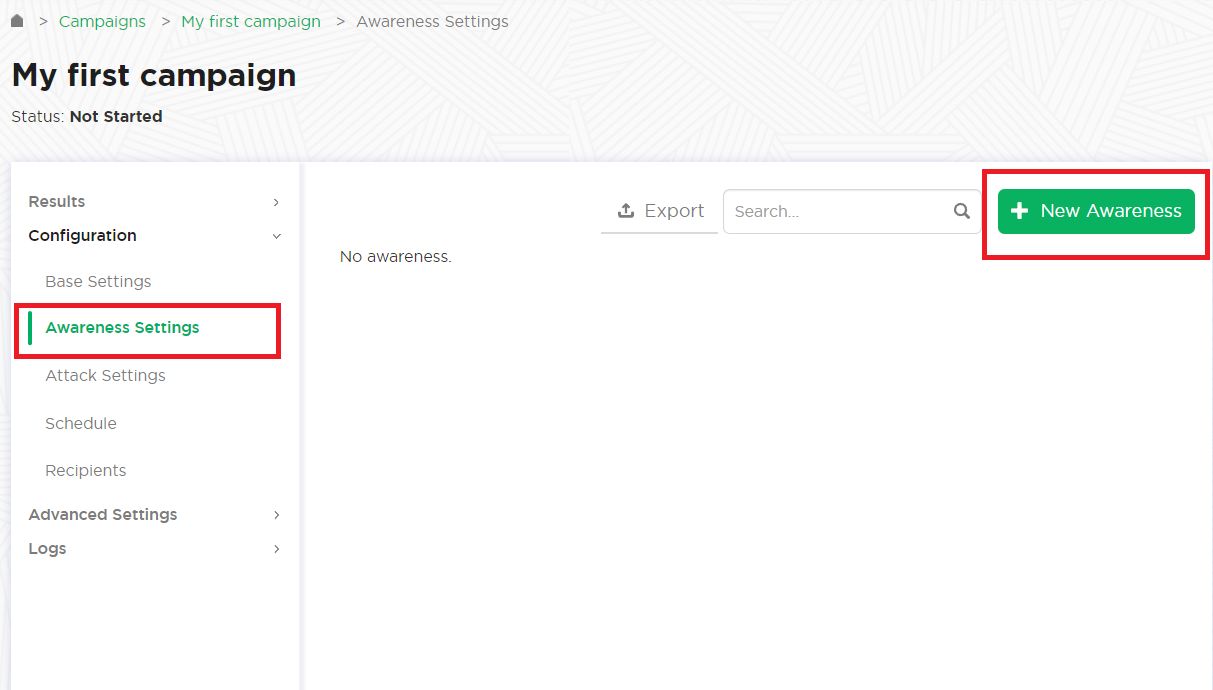
For a) & b): Please, go to Attack Settings and then click the New Scenario button at top right
If you want to do a training only campaign: Please, go to Awareness Settings and then click the New Awareness button at top right
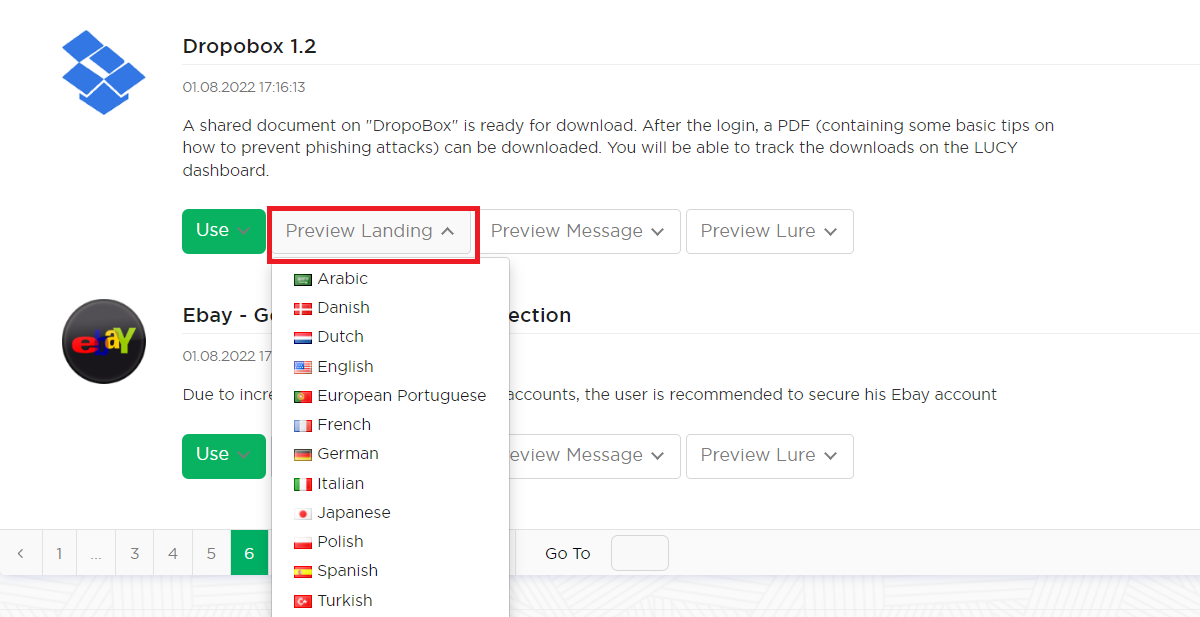
You are able to preview every template before selecting it. In the Preview Mode you can test the site using all the features (just enter some random login to get to the next page).
Notes
- Use multiple Scenarios: You can allocate multiple scenarios within one campaign and they can all be started simultaneously! Example: A company might want to split the employees into 2 or 3 groups. One group could get a phishing mail with a landing page that contains many obvious errors and should be easily detectable while the other scenario is almost perfect. This way the client can identify the variables that drive the awareness in one single campaign.
- Editing scenarios in a campaign: If you edit a scenario template within a campaign, the changes in the template will only apply to the campaign. If you change a scenario template in the generic settings, then the changes in the template are permanent.
- Scenario Types: Please learn which different scenario types are available.
- Update Templates: Make sure you have downloaded all the latest scenarios first. If you allocate multiple scenarios in a campaign, you can still activate or deactivate them at a later point.
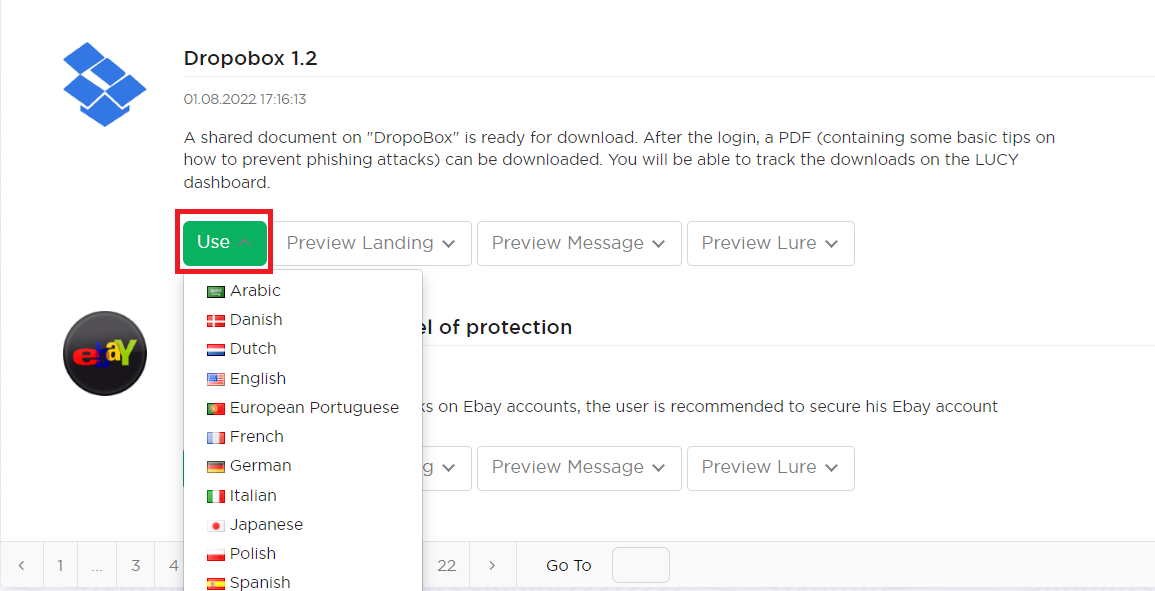
For this tutorial, as an example, we select the Dropbox 1.2 Click Use and select the language.
STEP 5 - Configure the Base Settings of the template
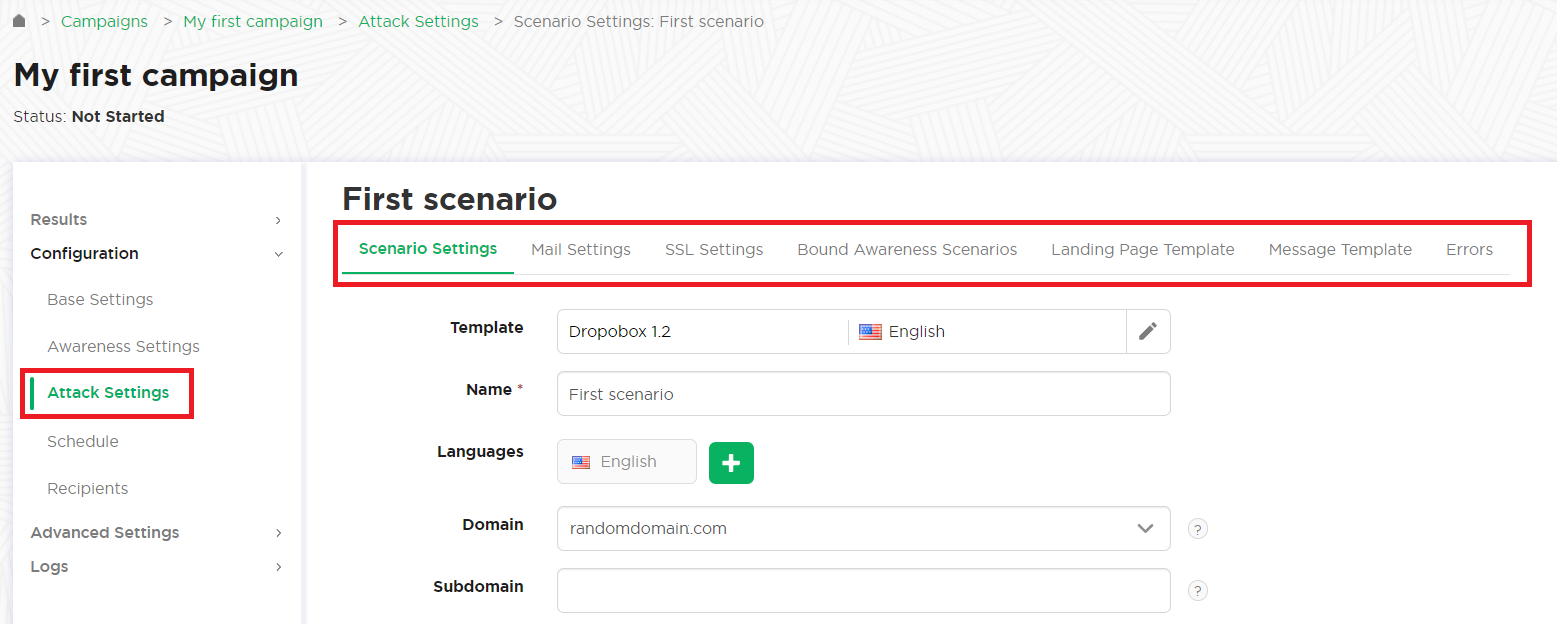
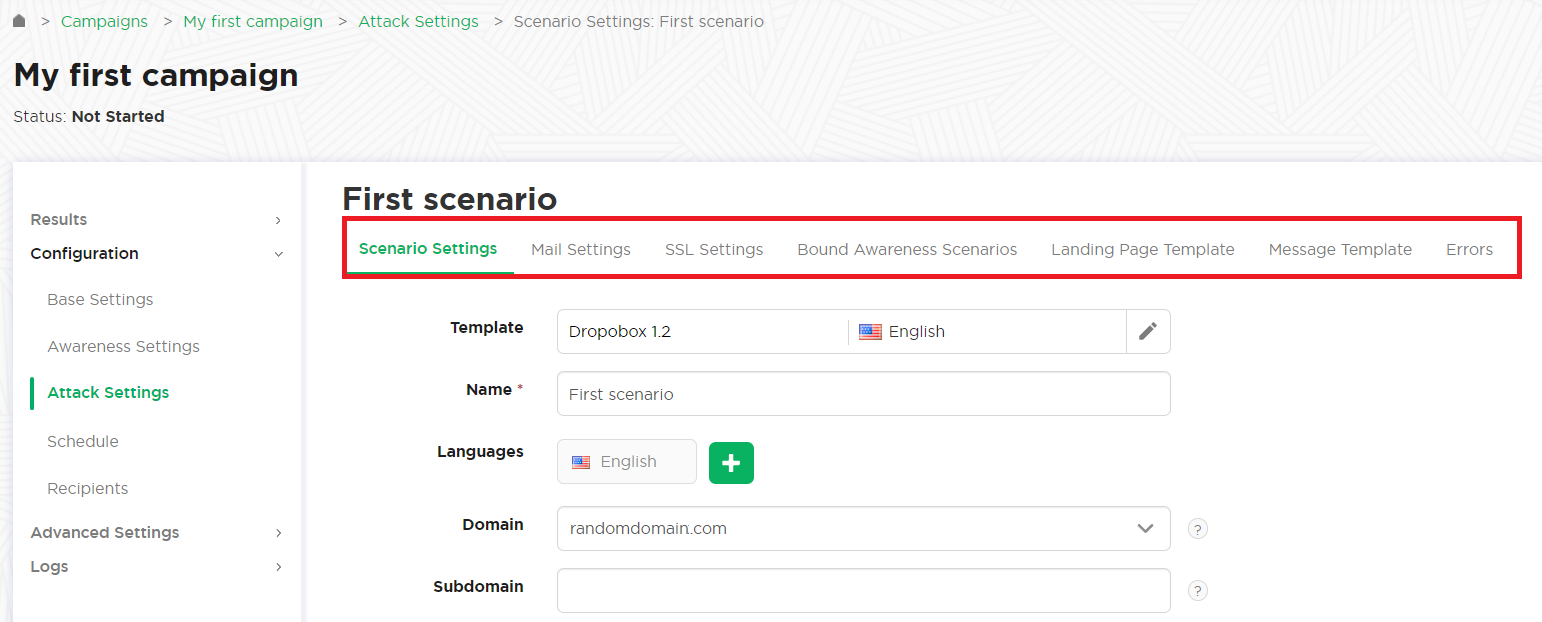
Once you have selected the scenario, you need to configure the Settings of this template. So every template has its own unique settings (mail delivery method, domain, ssl etc.). You could, for example, send an attack simulation X using the built-in mail server and an attack simulation Y using an external mail relay. You find the settings of each scenario if you click on the left navigation item under Attack/Awareness settings within the general campaign settings, and then at the top according to settings in the scenario:
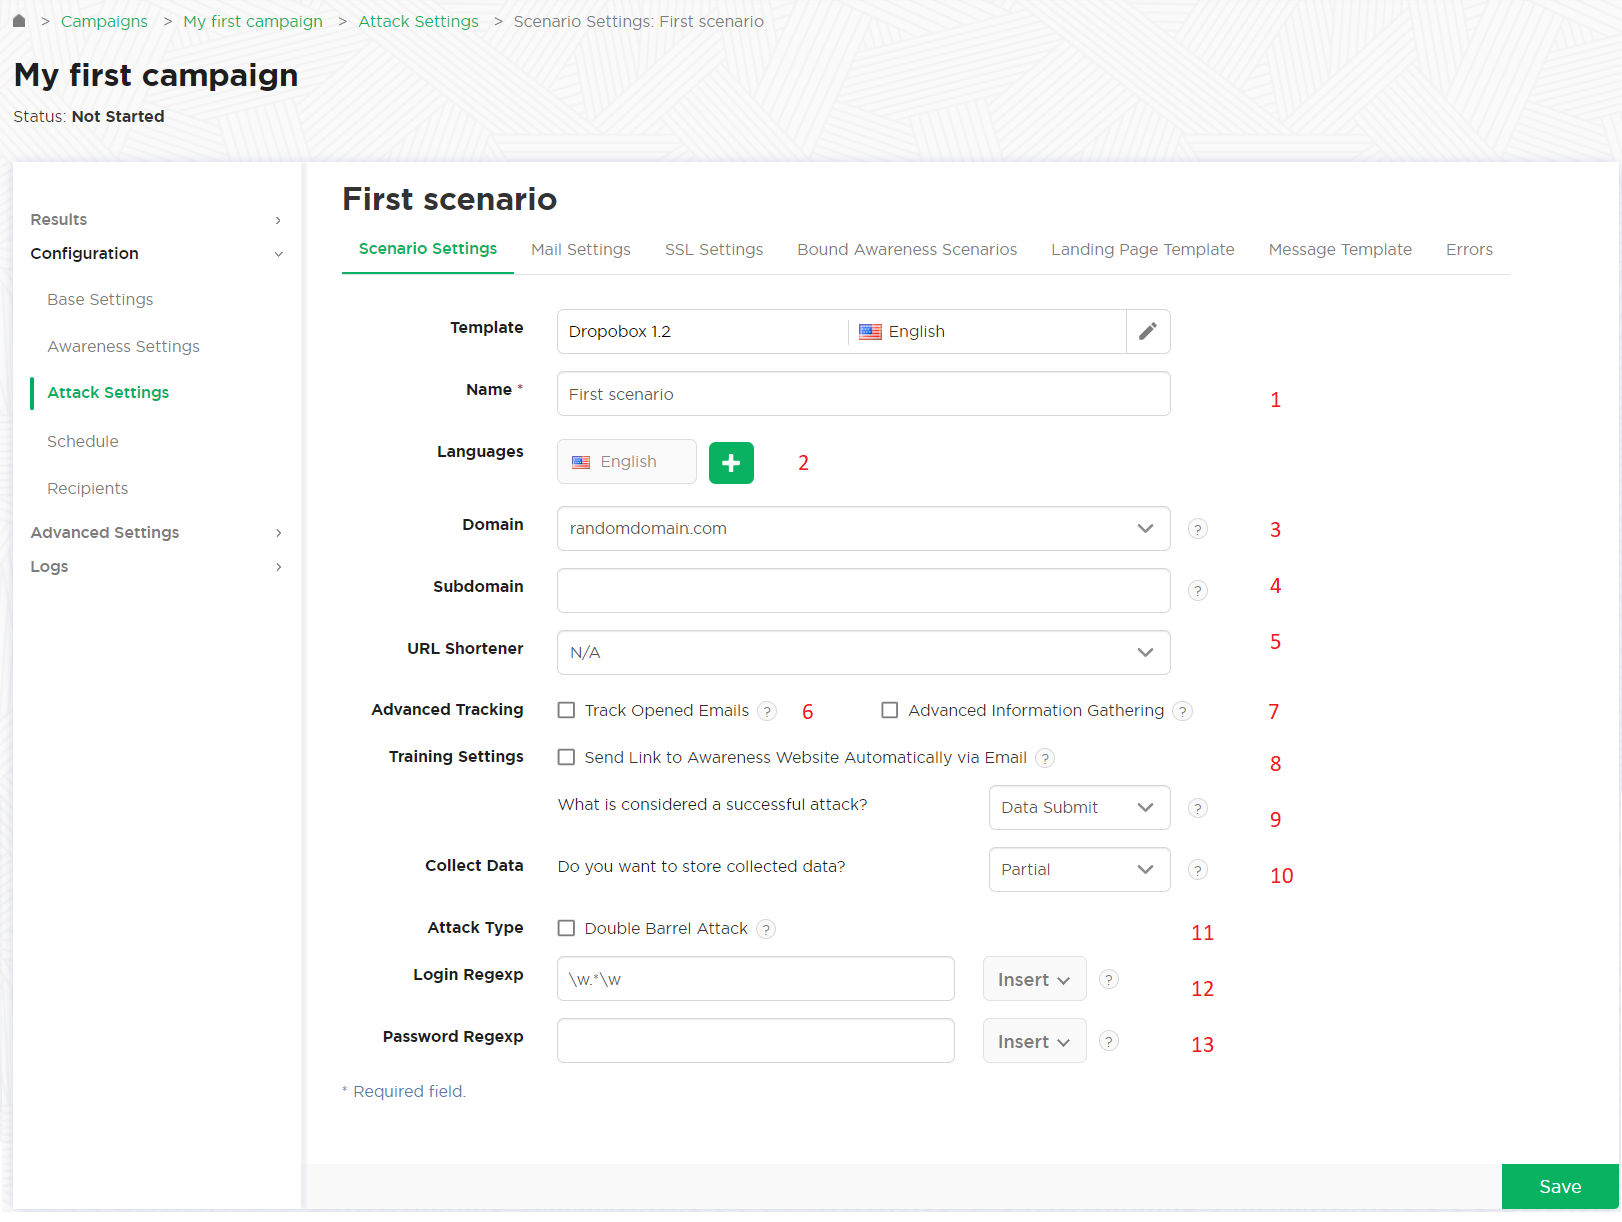
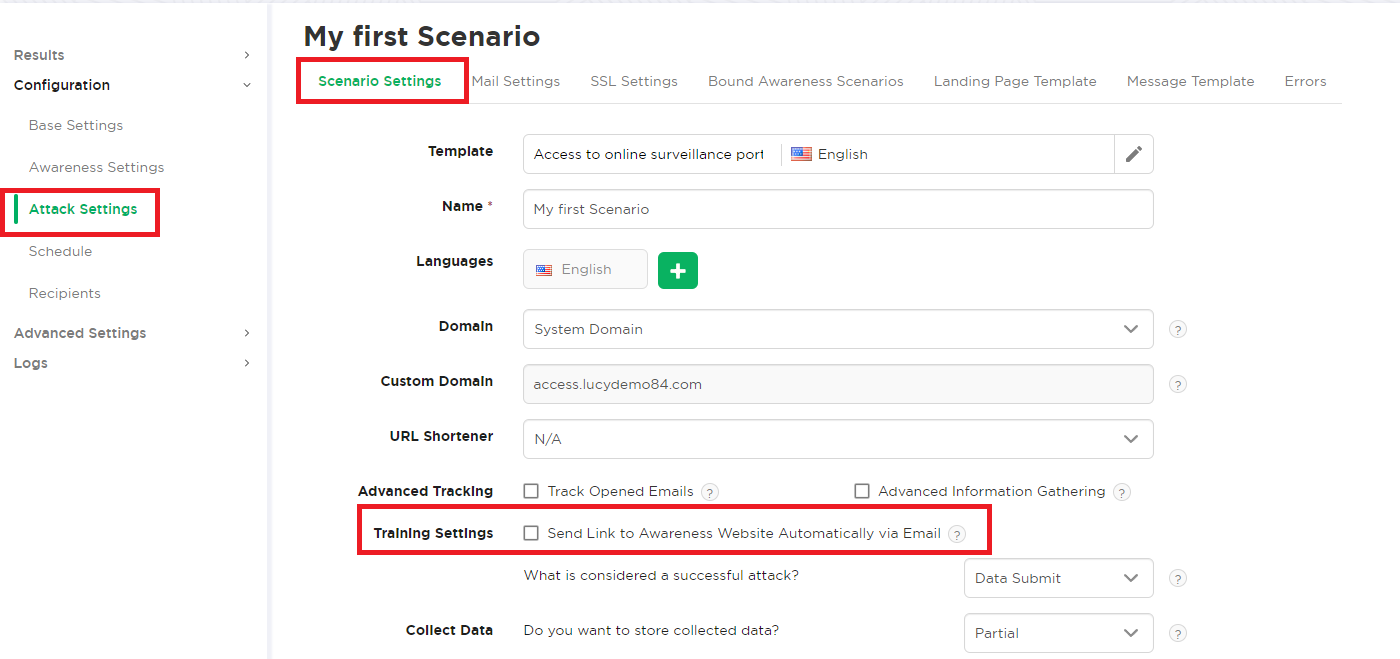
Once you opened the specific scenario editing menu, please, navigate to Scenario Settings to get back to this page at a later point. Here is a list of configuration items in this menu:
| Number | Description | Mandatory? | WIKI link |
|---|---|---|---|
| 1 | Scenario Name: First, give your scenario a name. This could be the name of the attack for example (like "social-media-hyperlink-attack" | Yes | - |
| 2 | Languages: Within the scenario settings you now have the possibility to add further languages. | No | - |
| 3 | Domain: Choose how your recipients will be able to access the webpage by defining the Domain. This domain does NOT relate to the email domain from where you send the attack simulations. It only refers to the landing page (the domain of the page that appears when users click the link). Finding the appropriate domain name is a very important step for success and it depends very much on your campaign scenario. If you plan to create a fake web mail login you could reserve a domain like "webmail-server365.com" and point it to LUCY. | Yes | Domain configurations |
| 4 | Sub Domain: If you selected a domain, you can now specify the subdomain. Let's say your main domain is cloudservices.com and you want to spoof your own company called "spoofy". The subdomain you could enter in this field could be "spoofy". The link to the attack simulation page then would be spoofy.cloudservices.com | No | - |
| 5 | URL Shorting: When you place the %link% variable within the message body and your scenario uses a public domain name, it will automatically be shortened. The link will look like “http://is.gd/9VjDKF” to fit into one text message. If you use an IP address for your landing page the link will be not shortened. | No | URL Shortener |
| 6 | Track Opened Emails: Inserts an invisible image into outgoing emails to track if users opened the message. Use this feature carefully as some email servers may put such emails into the Spam Folder. Also, some email clients (like Outlook) block the automatic downloading of images in the Preview window. | No | Track Open Emails |
| 7 | Advanced Information Gathering: Enable this option to enable advanced information gathering on the user who accesses your attack simulation. | No | Advanced Information Gathering |
| 8 | Send Link to Awareness Website Automatically: Send a link to the Awareness Website after a user has been successfully attacked. Please note that the Awareness Website should be published for this feature to work. You don't need to send the user an email for the training. You could also redirect the user to the training page directly within the attack scenario | No | Redirect the user to the training |
| 9 | Success Action: Defines what LUCY considers as a successful attack. There are 4 options. Those success actions define at what point the eLearning should be started. If you choose data entry, the eLearning would only be started once the user enters some data on a landing page. So if you use data entry as a success action on a file-based template without a login, the eLearning will never be sent to the user! | Yes | Success Actions |
| 10 | Collect Data: Choose "Full" if you want to record all entered logins and passwords, "Partial" to record only the first 3 letters (remaining letters will be masked with asterisks) or "No" to skip user data collection. | Yes | Do not transmit data |
| 11 | Double Barrel Attack: When using Double Barrel Attack, the system first sends a "Lure" email containing some teaser text. After that, the system waits for a while (you can configure that time in settings below) and sends an actual phishing email. The "Lure" delay defines, in seconds, the time frame between the Lure and the attack emails for a Double-Barrel Attack. | No | - |
| 12 | Login Regex: Another option is to define some login filters to only catch valid logins (you could define the Domain Name in the User Name field or say that the Password has to be at least 8 characters to be accepted from LUCY). | No | More Info |
| 13 | Password Regex: If you want to validate logins and passwords using regular expressions ("Login Regexp" and "Password Regexp" fields in Scenario Settings), please set the name of the login field to "Login" and the name of the password field to "Password". | No | More Info |
Once you saved the base scenario settings, a new menu for this specific scenario will appear on the top:
It allows you to configure more options. Some of them are part of the next chapter. Two should be listed here:
Mail Delivery Method (1): a scenario will be sent by the mail delivery method you specified in the generic settings. Those settings can be overwritten for every single scenario here. In LUCY the default delivery method for mails is using the build-in Postfix mail server. As many SPAM filters will block emails coming from a new IP-address that has no reputation, the administrator can decide to configure an external mail relay.
SSL (2): If you decide to use SSL for the campaign (either generate a custom certificate or import a trusted certificate) you can do this via the SSL Wizard.
STEP 7 - Edit your Landing Web Page within Your Campaign
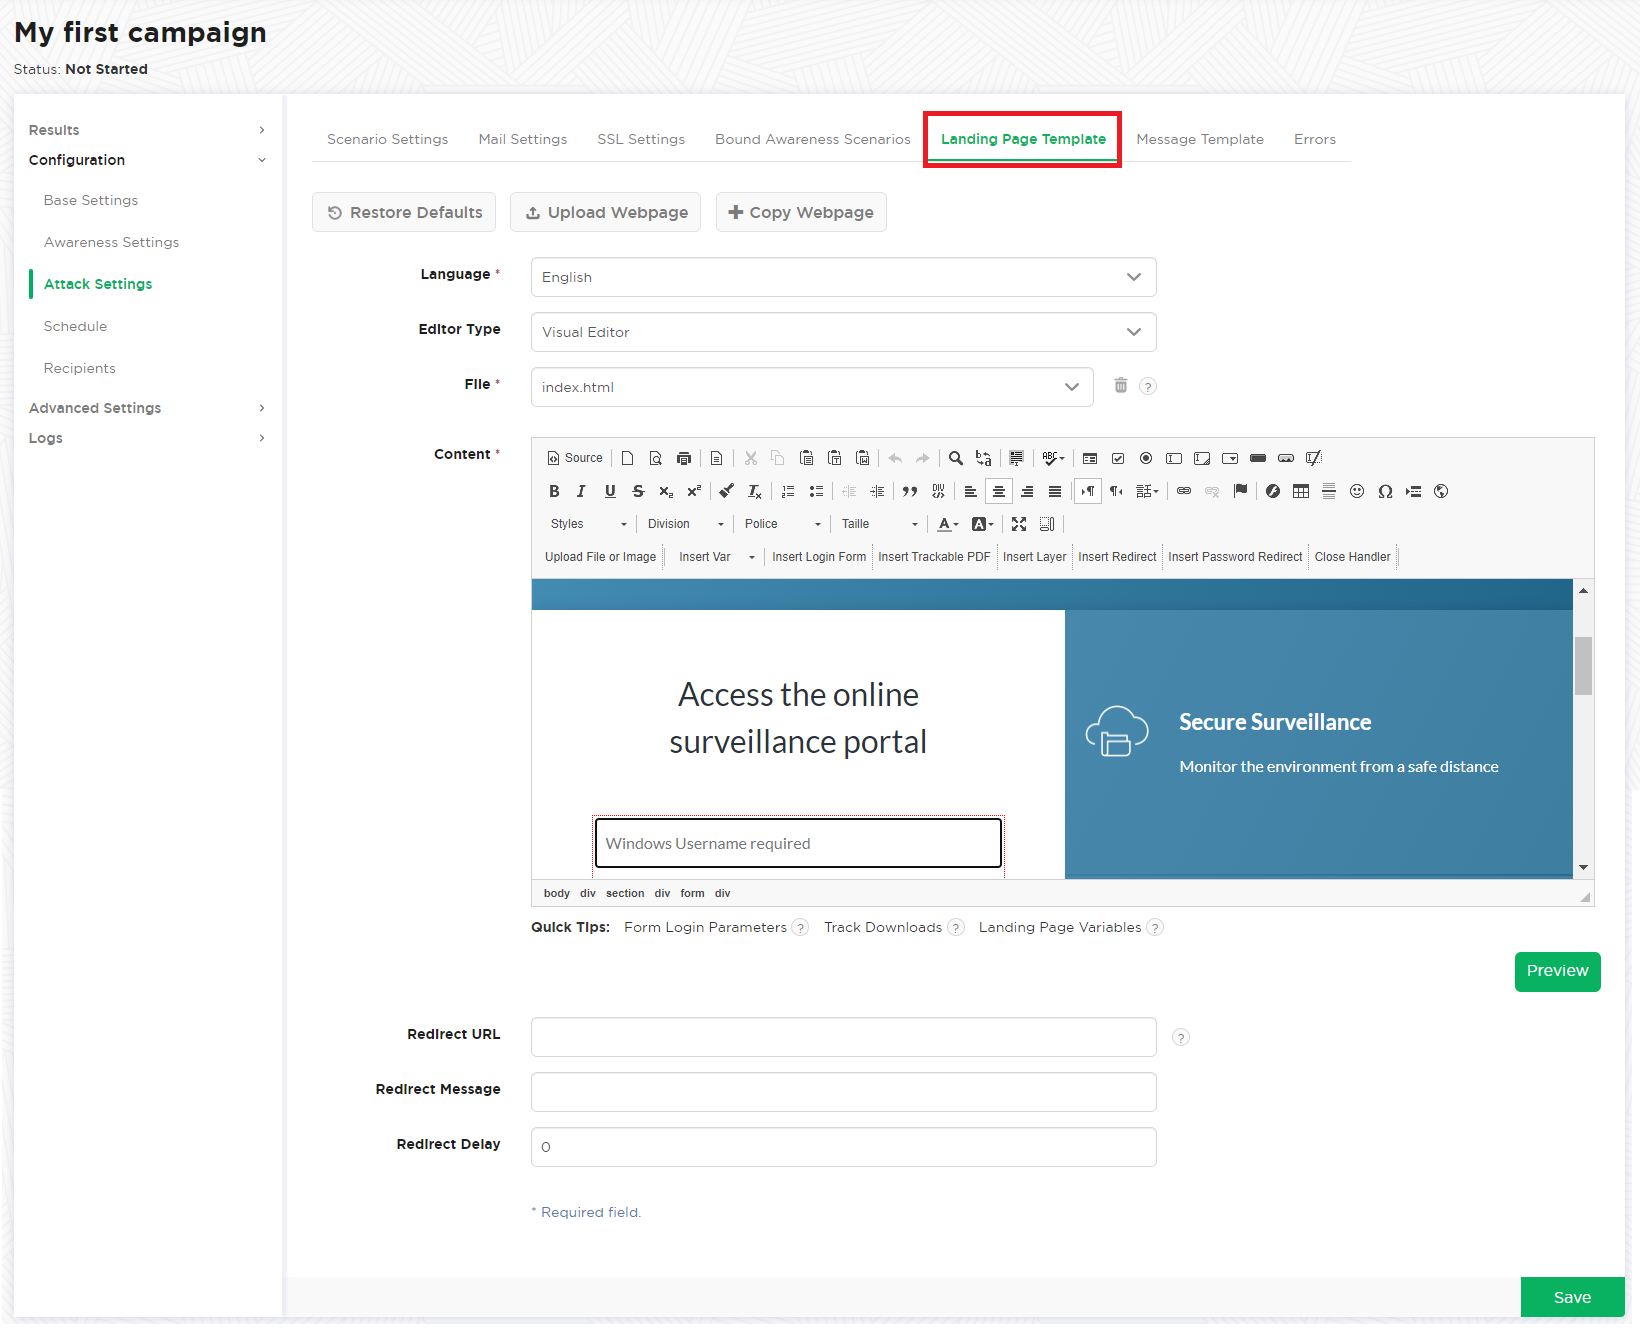
After saving the Base Settings, you can now Edit the Landing Page, Upload Your Own Webpage or simply copy any website on the internet. The Landing Page is the webpage that the users will see when they click on the link in the email they receive. First, select the drop-down menu at the top of the page where you want to edit. Please note, that the same landing page may be available in different languages. So make sure you edit the correct language.
Note: If you edit a Landing Page which is based on a pre-defined scenario template in a campaign, it won't affect the default scenario templates. Only if you go into Settings → Scenario templates and start editing the templates outside the campaign will all changes will be stored permanently to this specific scenario.
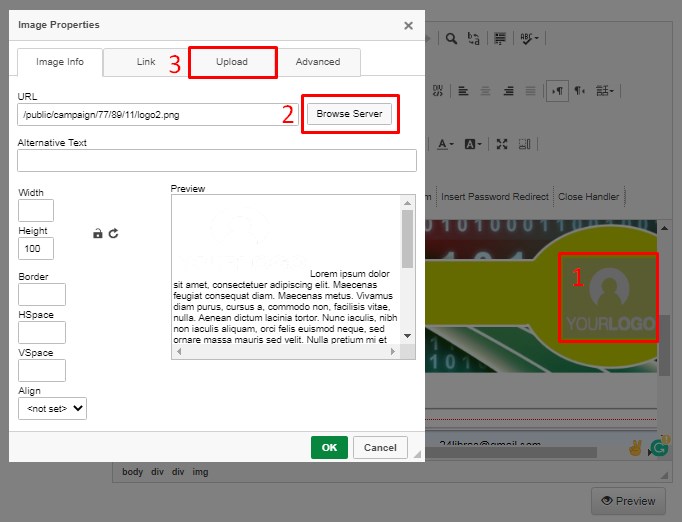
Example: Let’s assume that you want to replace the logo on the Landing Page: Just double click on the existing logo (1). In case your new logo is stored in File Manager then just click Browse Server (2) and add it to the page.
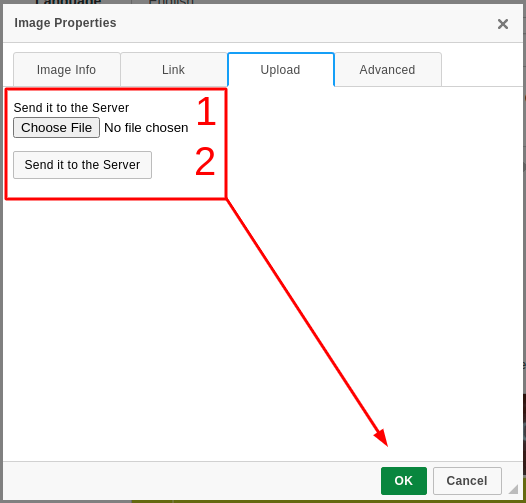
If you need to upload a new file to use within the template, navigate to Upload tab, then select your own file (4), Upload it (5) and save the changes by clicking OK.
STEP 8 - Configure the Message Template (Email or SMS)
It’s time to setup email communication (if you want you can also use SMS as an alternative).
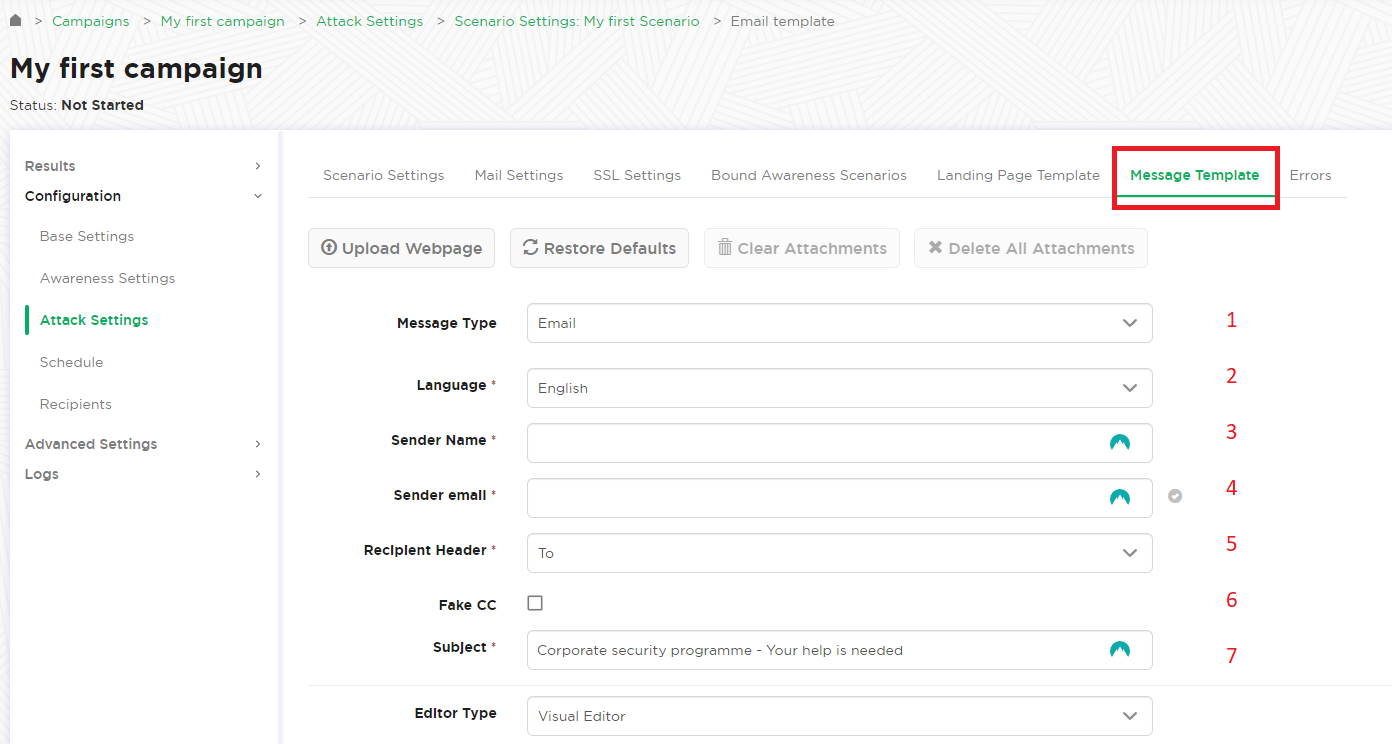
Step 8a: Choose your:
- Message Type (1): Email or SMS
- Choose your Language (2)
- Sender Name (3): The sender name equals the "from" line in the SMTP message header and it is only used for display purposes. You can just write a name in there (like "Jon Smith"). If you just want to display a different name together with an e-mail address, write the e-mail address with the display name in brackets as such: <Joe Example> joe@example.com.
- Sender Email (4) address: Note: The most common reason for emails not arriving at your Recipient's Inbox are SPAM filters. When using a known email domain like test@microsoft.com or a non-existing email domain like test@nonexistant.com, your email might get deleted by SPAM filters. Some public email providers are very restrictive and might not even forward emails to your Recipient's SPAM folder. To verify this you can use LUCY's built-in SPAM Checker.
- Recipient Header (5): Lucy also provides an ability to send all mails via CC or BCC.
- Fake CC (6): You can define a fake TO: address.
- Subject (7): Create a Unique Subject Title In your e-mail header, include something unique to the recipient that's unlikely to be in a Spam message. Examples could include your company name, the name of one of your target's competitors, or the name of a person with whom the target is already familiar.
Step 8b: Please also choose the language (2) for each group. If you configured an English landing page, then select English also within that recipient group. If you have different groups with different languages within your company you can simply create a group and select a language for each recipient. LUCY then will direct each user to an individual landing page that matches that language.
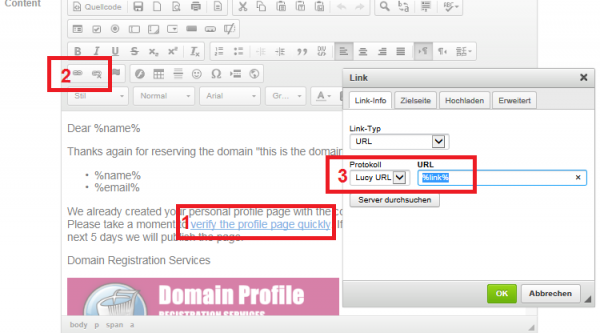
- Step 8c: Insert a link. The editor allows you to insert a link. You have two options: either insert %link% somewhere in your email body (this will generate a randomized link to identify the user) or select and mark a word in your mail body (1) and then click on the link symbol (2) and then insert the "LUCY link" with %link% in the input field.
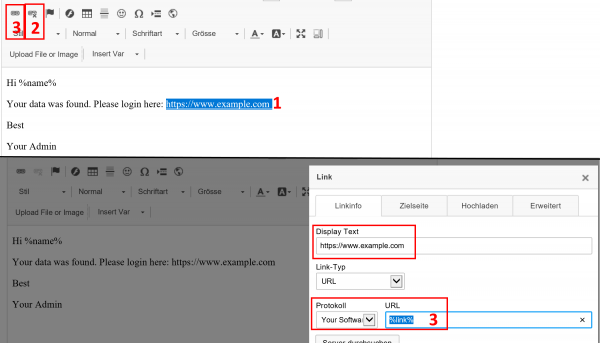
Please make sure the link variable is set in the HTML code, if you hide it behind another Link. If you type a hyperlink instead of a word, the editor will automatically detect that, and create the link in the code. But this link will be wrong: If you type http://www.example.com in the editor, LUCY will automatically create a hyperlink to http://www.example.com in the HTML code (1) and underline the URL. But if you want http://www.example.com pointing to your LUCY URL, please remove the link pointing to http://www.example.com in the source code directly, or remove it by clicking on the "unlink" symbol (2), and then select the text "http://www.example.com" and click on the link symbol again and insert %link% in the HTML code (3).
For all other settings please read the Mail Settings Chapter.
STEP 9 - Add recipients
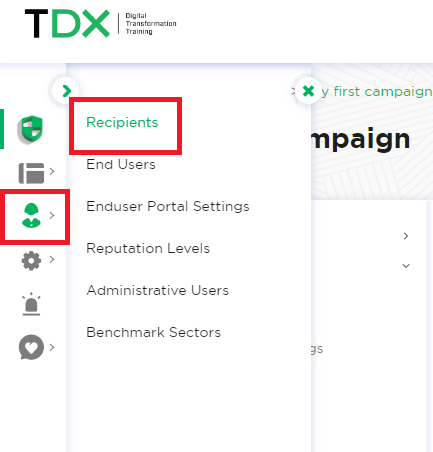
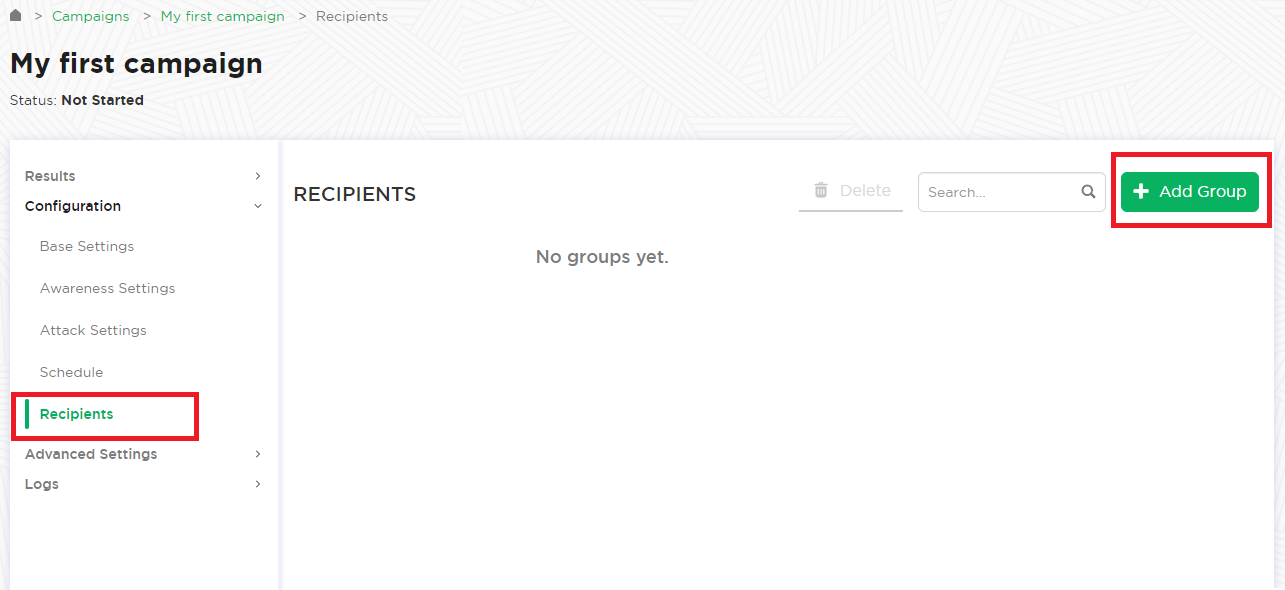
You need to create the Recipients List in the Menu item Recipients.
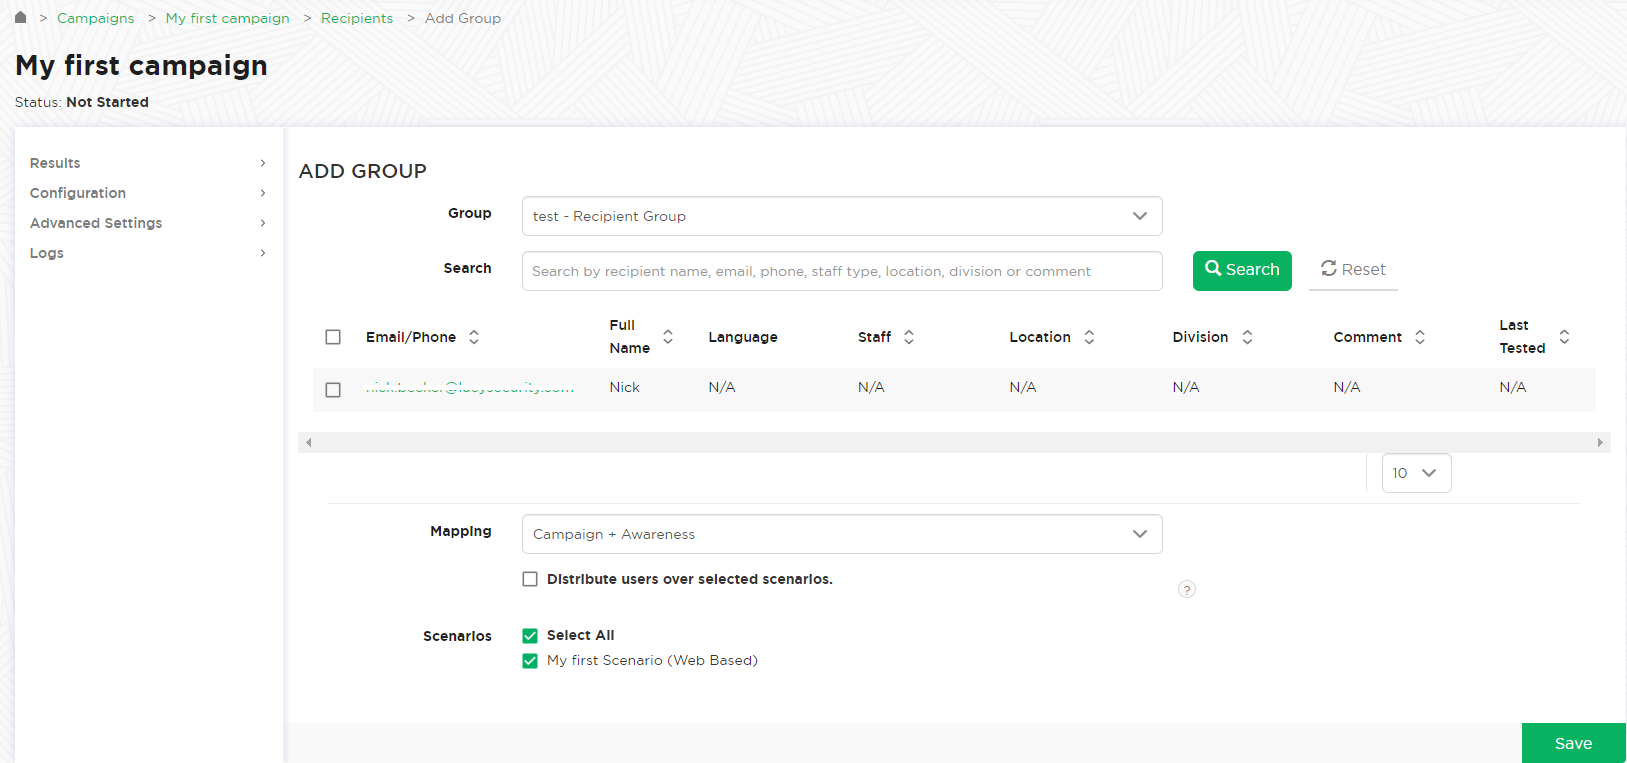
This is the list of users that will get the phishing emails. You can add them manually, import a file with all your recipients, import them via LDAP or even search them on the internet. Once you have created that group, you can select it in your campaign and map them to a specific scenario. You can also define if they should be used only for the Landing Page link, the Awareness site link (e-learning) or both.
Please read the Recipients Settings Chapter for more configuration options.
STEP 10 - Add Scheduling Options to Your Campaign
If you want, you can create a schedule to run the campaign using a delay or customized time delays between campaign phases. If you are new to the system, we'd recommend that you go with the Default Timing Settings and skip this step. Please read the Schedule Settings Chapter for more configuration options.
STEP 11 - Add E-learning Content to Your Campaign
You have the ability to provide the user with some awareness training in case he fails the phishing simulation. A failure to pass the phishing simulation is considered as a successful attack in LUCY. Therefore, it is very important that you define what you consider as an successful attack (because only those who have been successfully tested, will receive an awareness training). The awareness training can be done in two ways:
- Send the eLearning via Mail: There is the option to have LUCY automatically send some e-learning content to all users or only users who have failed the phishing test. This configuration setting is part of an Separate Chapter (E-learning). If you want the users to get an e-mail with a link to the awareness content, you need to make sure that in STEP 5 - Configure Basic Settings the checkbox Send Link to Awareness Website Automatically is selected and you configured an awareness template (mail and optional landing page).
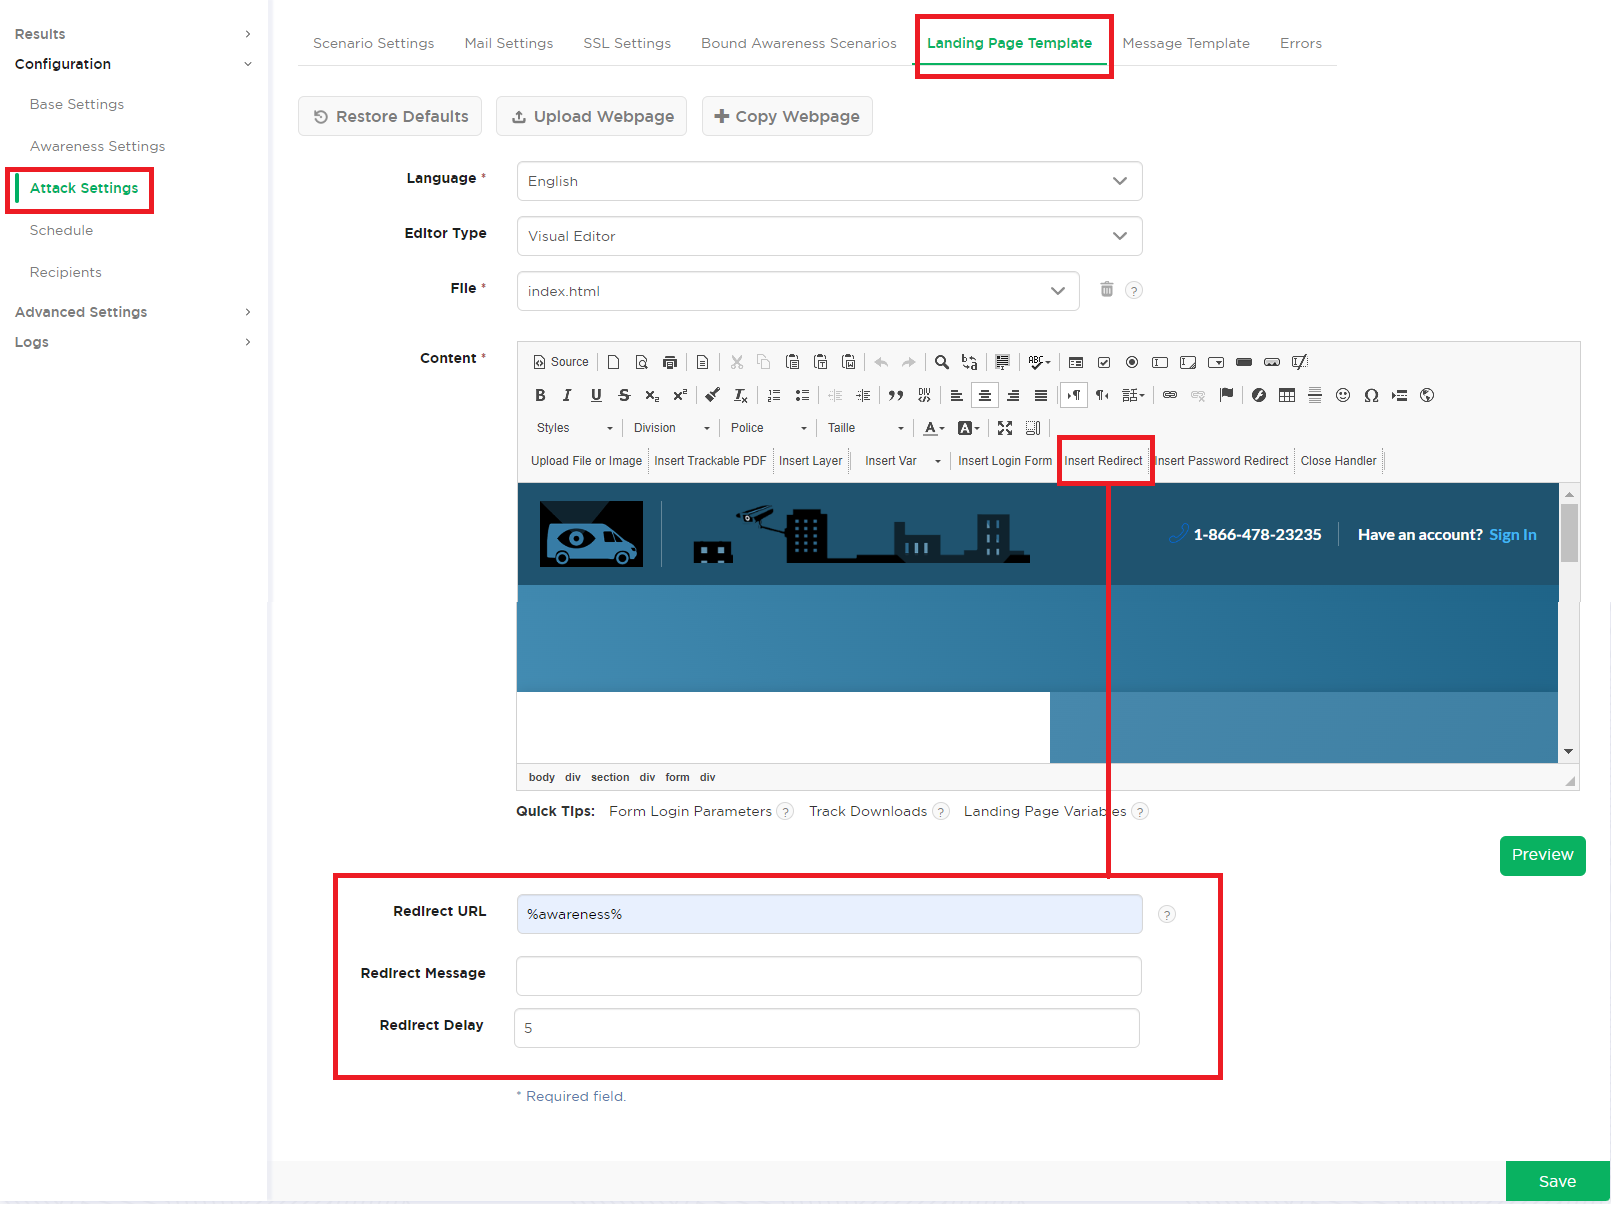
- Redirect the user from the phishing simulation directly to the eLearning page: If you don't want the e-learning content to be delivered via mail you can also redirect the user directly to a landing page with the awareness content. Among the many variables that may be used in LUCY there is one called %awareness%. You can place that in the redirect input field described above (hyperlink based or web-based). It will redirect the user automatically to the eLearning content when a link is clicked or data is submitted.
STEP 12 - Start Your Campaign
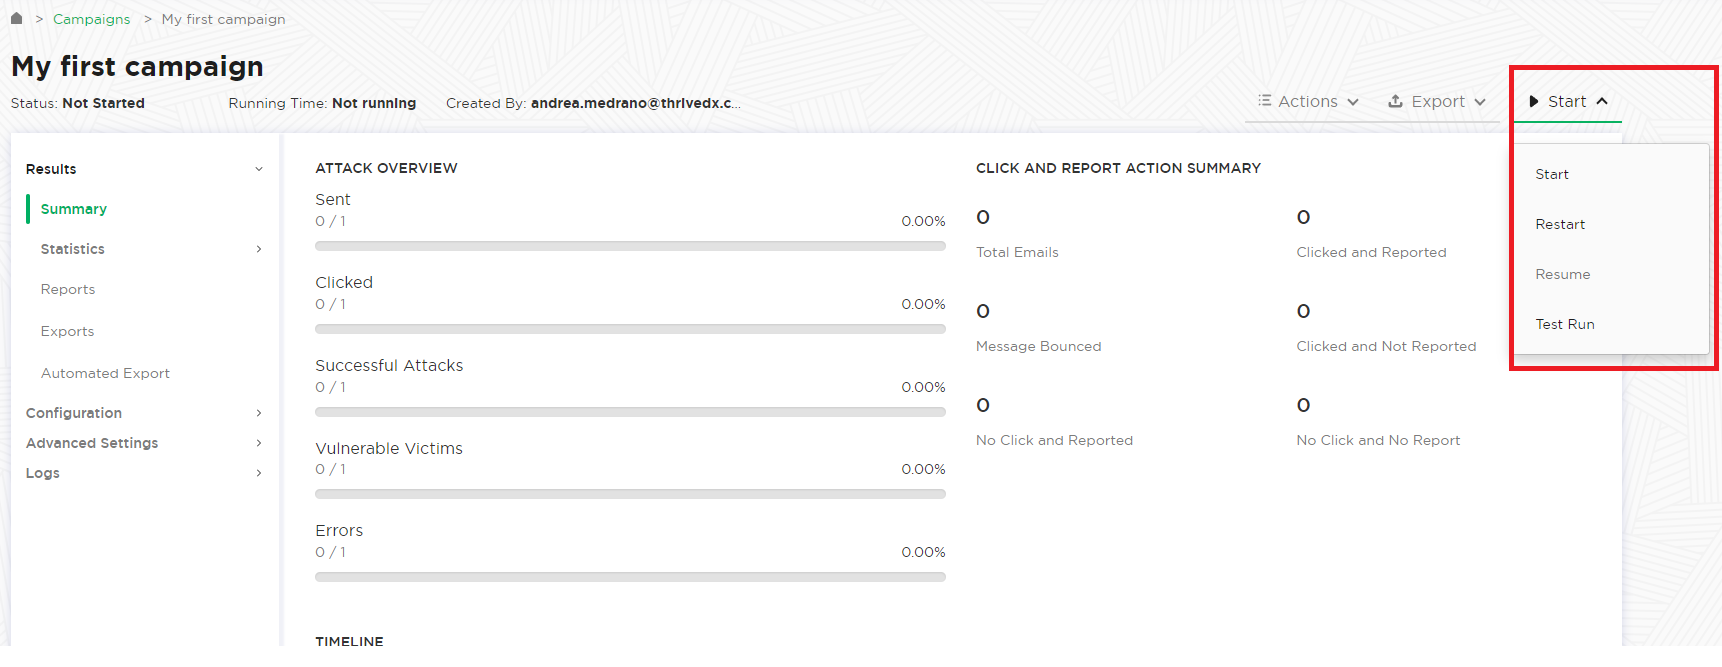
Now you are ready to start. Although we recommend performing a test run with a single recipient before you start attacking all users, additionally it is a good idea to use the LUCY SPAM Checker. Just click Start and LUCY will test your settings before starting the campaign. If you want to skip the checks, press Skip Checks. Your first recipients should receive the emails within seconds. Please read the Start Campaign Settings Page for more configuration options. If you experience any problems with starting/running your campaign, please Consult the Troubleshoot Section first.
STEP 13 - Monitor Your Campaign
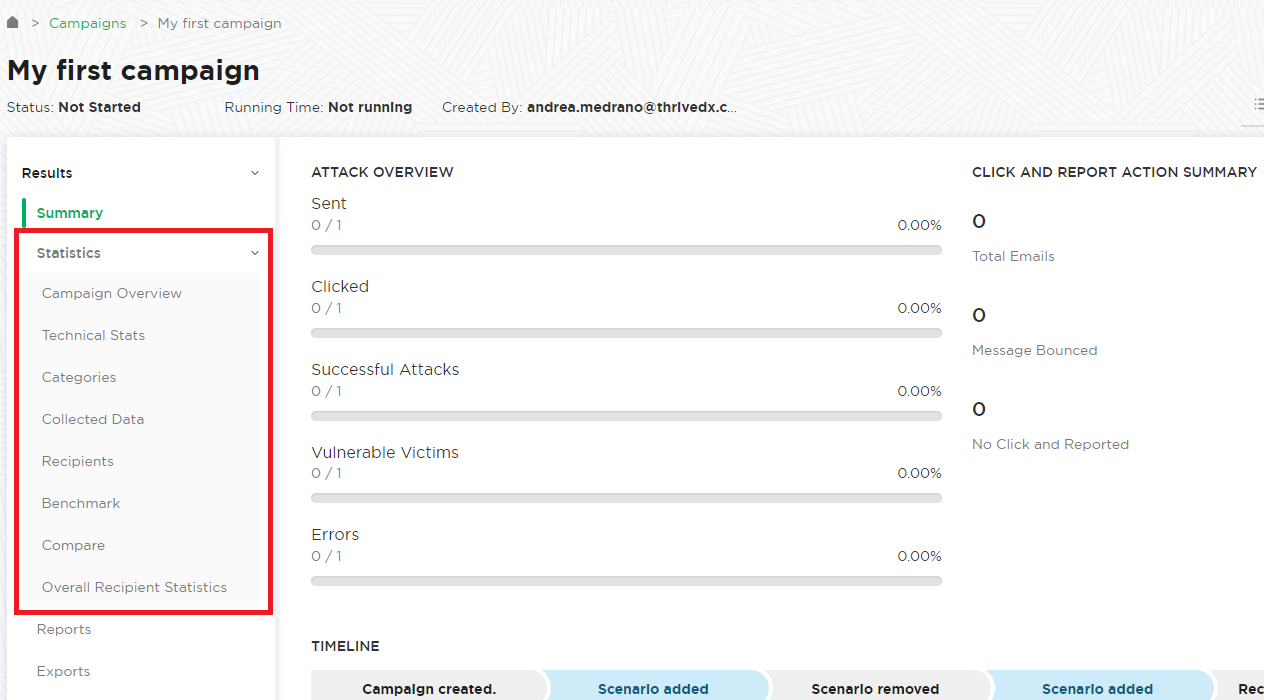
The progress of the campaign can always be monitored in Real-Time. Click Statistics within your campaign. Please, read the Statistics Chapter for more configuration options.
STEP 14 - Create Reports
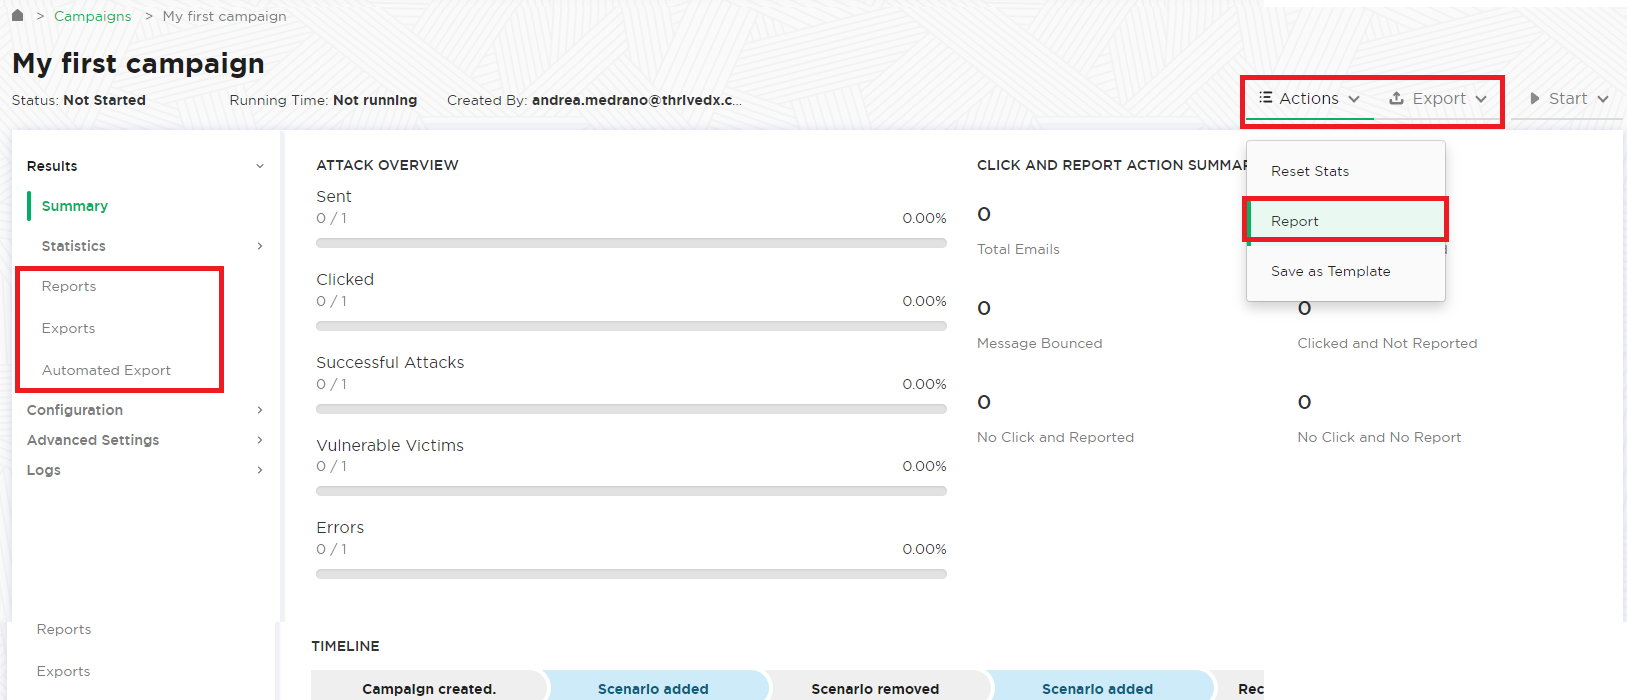
Once you have finished the campaign, you may either export the raw data (CSV/TXT export) or create different types of reports (PDF, HTML, DOX or raw export). Please read the Creating Reports Chapter for more configuration options.
Troubleshooting
If you experience problems with your campaign please use this WIKI with the free text search option or contact us under support (at) lucysecurity.com


