Table of Contents
LUCY WYSIWYG Editor
Background Info
With the Page Editor, you can fine-tune and edit all the web pages or sub pages from all scenario types. This includes:
- Any Scripts or Style sheets
The editor can only save HTML code which is compliant with W3C standard. You can always check your code with this validation service: https://validator.w3.org/. Code which is not W3C conform will not be saved by LUCY.
How to select a page that needs to be edited
The HTML pages can be edited either in the generic template section or within a campaign. If you change them in the generic template section the changes will remain for all campaigns that use that template in the future. Therefore it might be better to make the changes of a page within a campaign. This will change only the template within that specific campaign.
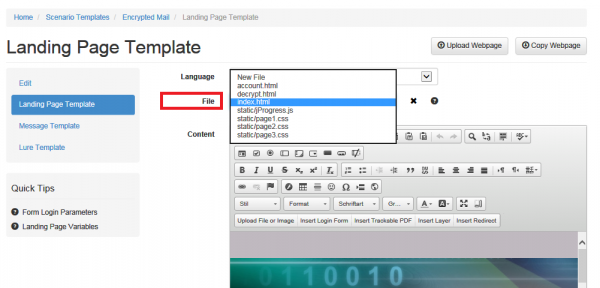
Every page and script can be edited. To get started you must first select the page within the dropdown menu that you want to edit:
There are two editing modes:
- visual editing within the editor or
- editing the source code directly
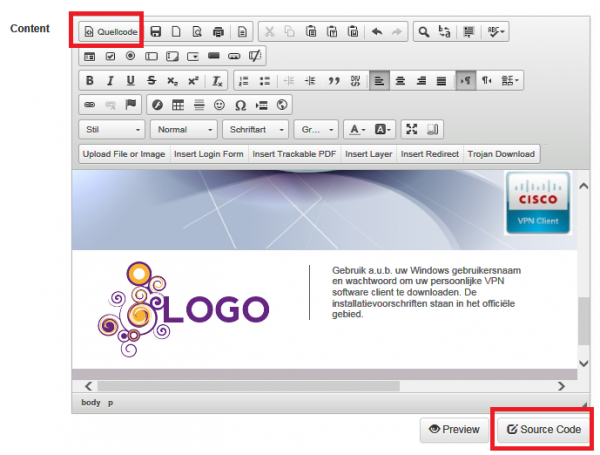
If you want to switch to the source code editing mode you can use one of the two available buttons:
Creating new pages
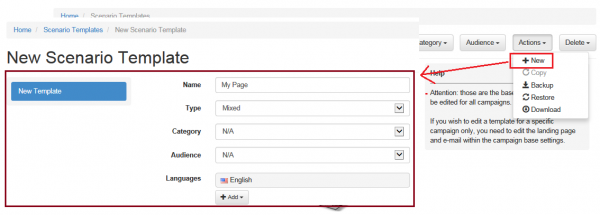
You can create a new page by going to actions –> new. Then give your page a name and tell LUCY what type it is (this matters: if you select a "web-based" type, then the WYSIWYG editor will be missing the Trojan simulation buttons. To be on the safe side we recommend using the mixed type).
To add content to the new page you can now either:
- Upload an existing page (zip)
- Clone a page (click here for more details)
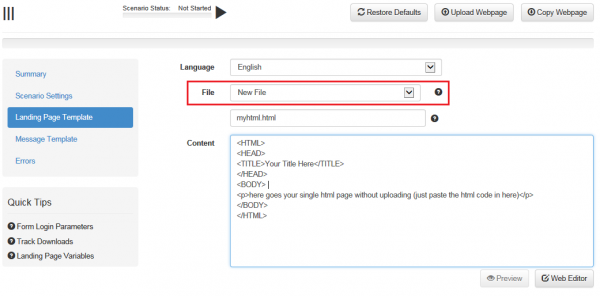
- Click on the "landing page template" link and start inserting your code manually (1st click "new file" and give your page a name. If it is the 1st page then it needs to be called index.html)
Special LUCY Editor shortcuts
The LUCY Customized WYSIWYG editor allows you to insert tables, forms, objects, etc. You can also right mouse click on objects in the Preview and you will see more editing options. The editor has some Special Buttons which will help you to create a phishing page within minutes.
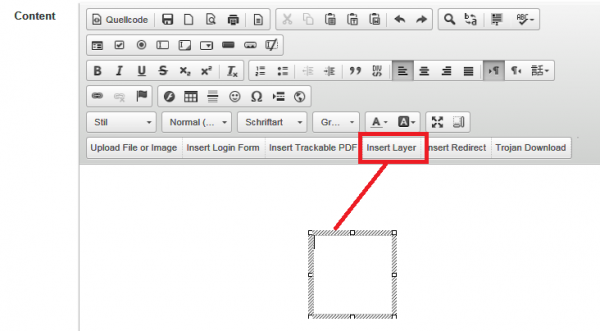
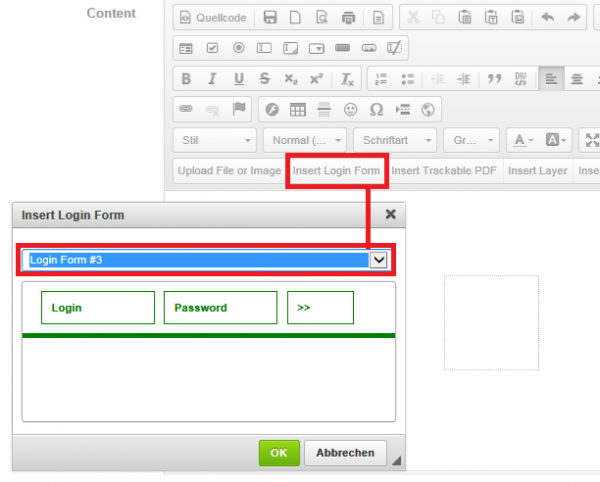
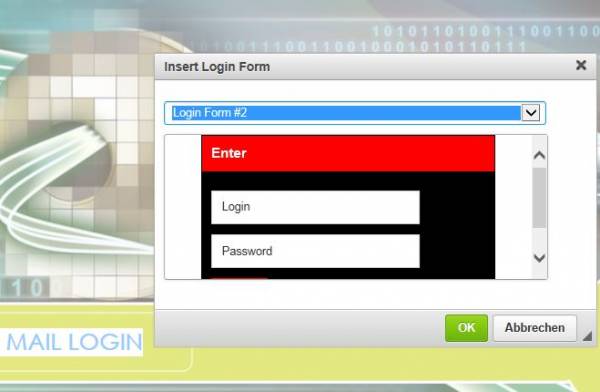
- Insert Login Form: Places a functional Login form on the page (you have three design samples). In case you want to place the Login form in a specific area of the webpage, you first need to press "Insert Layer". As soon as you inserted the layer click on it so the cursor appears inside the layer:
Once the cursor appears you can click on "insert login form". Select the login form design you want to insert and then press ok:
As soon as you did that the login form will appear inside the layer, which you can still move around or change its properties within the source code.
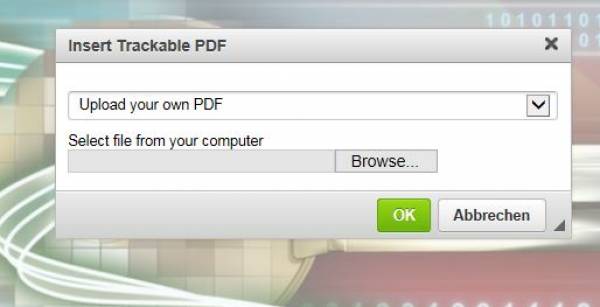
- Insert Trackable PDF: Enables you to upload a trackable file or use an existing dummy test PDF for tracking.
- Insert Layer: This is needed if you want to place a login form or any other element (e.g. image etc.) in a specific area of the webpage. Imagine the layer as something similar to a text box in Office.
- Insert Redirect
- Insert Trojan Simulation: Adds an download button that is linked with one of the Trojan simulations available.
File Manager in LUCY
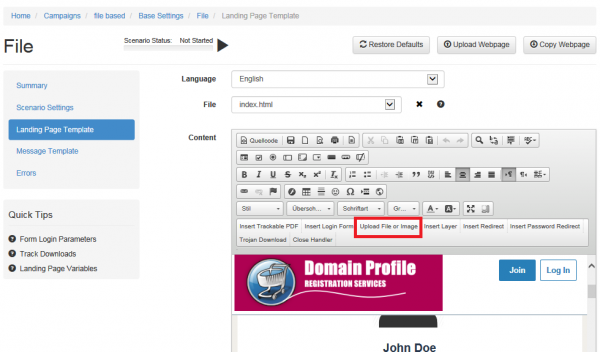
You can upload any file or image using the build in file manager. The file manager can be accessed within the according scenario when you edit the landing page:
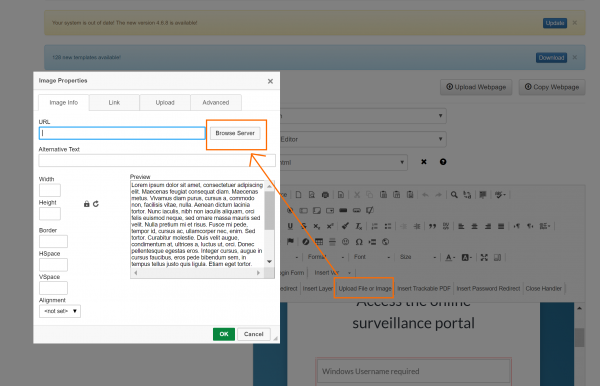
Step 1: Click on "upload file or image" Step 2: Click on "browse"
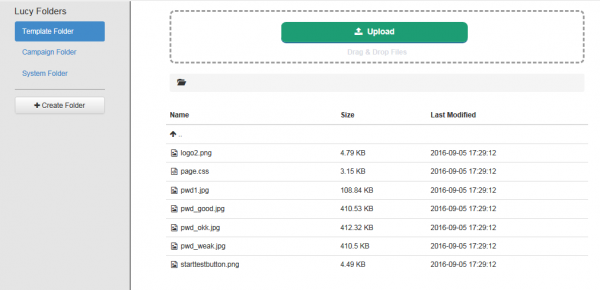
Step 3: Upload your image Step 4: Click ok
You can use the upload button to upload the files or simply drag and drop one or multiple files into the browser. Depending on the file type LUCY will automatically place the files in the correct directory (images are later stored in a central image repository).
Form field syntax
LUCY is recording ALL data send back to the landing page in a form POST request. So the form action has to look like:
- form action=""
But in order for LUCY to apply regular expressions in a login field the login form should use a POST method and set the login action to “?login”, you also need to set the name of the login field to “login” and the name of the password field to “password”. A valid login field on LUCY where regular expressions can be applied might look like this:
<form action="?login" class="login-form" method="post" name="login-form">
<div class="content"><input class="input username" name="login" placeholder="Username" type="text" />
<input class="input password" name="password" placeholder="Password" type="password" />
<div class="footer"><input class="button" name="submit" type="submit" value="Login" /></div>
</form>
Using a login Form that only submits the username, but not then password
Each input field must have a name attribute to be submitted. If the name attribute is omitted, the data of that input field will not be sent at all. This example will only submit the "User Name" input field:
<form action="">
User name:<br>
<input type="text" name="name" value="User"><br>
Password:<br>
<input type="text"  value="Password"><br><br>
<input type="submit" value="Submit">
</form>
Naming Convention
The system uses 2 predefined file names for all pages that simulate some sort of a login:
- index.html - The first page that the user sees after clicking on the link in the email message. Usually, it contains a login form (but you can use it for any other form as well: LUCY simply checks if there is a form-based POST request, independent from the from variable names). All other pages are forbidden until the user enters login details on this page. The login form should use a POST method and either point to the same page (have an empty action attribute) or have an action set to "?login" (<FORM action="?login" method="post">). If you want to validate logins and passwords using regular expressions ("Login Regexp" and "Password Regexp" fields in Scenario Settings), please set the name of the login field to "Login" and the name of the password field to "Password".
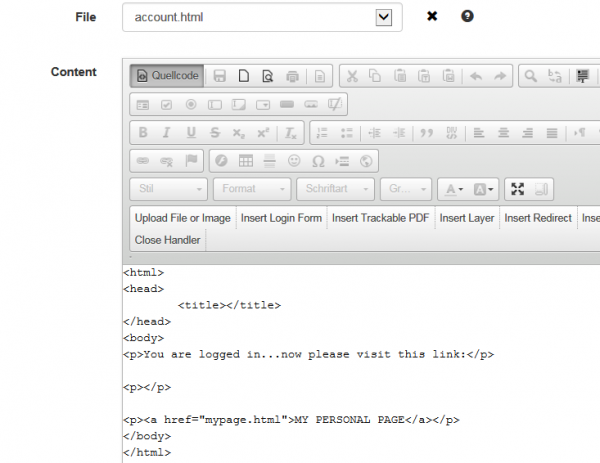
- account.html - The page that the user sees after entering valid login and password values (or any other form-based data submitted on the index page). Please note, that all submitted data on the index page is recorded in LUCY and visible in the statistics. If you are missing the account.html page, you will see the standard 404 error page in LUCY, which also can be customized. If you want to redirect the user directly to some other page than the account.html (e.g. the awareness site), please check out this chapter.
For other pages, you can choose any other name. This applies to web-based templates. On file-based templates, LUCY does not expect a second page. Therefore, you only have 1 index page. If you still need multiple pages, you need to solve this with JavaScript. Please check out the template "Encrypted Mail (Download Only)" as an example for a file-based template with multiple pages.
Links in LUCY
Example 1 - Links on page within the "authenticated area". If you create an index.html page where you ask the user to submit some form data to LUCY, LUCY will automatically assume the user is now "authenticated" and will write a cookie "auth=1". On the second page (e.g. account.html) you can place a link in the code similar to this one:
<a href="mypage.html">This is a link to "mypage"</a>
All you need to do is now create a mypage.html in LUCY and save it. It does not need any special directory. It also does not need the %link% variable appended in the source code.
Example 2 - Links within the index.html page, without submitting any data: If that cookie (auth=1) does not exist, LUCY will think no authentication has been done and therefore always redirect the user back to the index page. As a result link will not work yet. You can create the following code in order for this to work (make sure you append "%link%" to the page that you want to have linked):
<body>
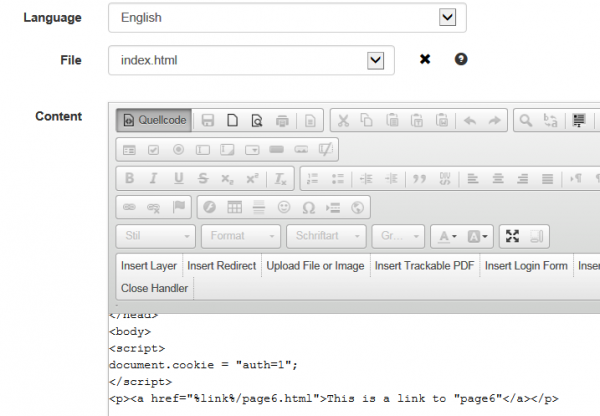
<script>document.cookie = "auth=1";</script>
<a href="%link%/page6.html">This is a link to "page6"</a>
</body>
Test: Here is a live example with the links described above.
Directory Structure
All files except HTML pages (for example, CSS or JavaScript files) should be created only in a "Static" directory. You can specify the directory by placing them in front of the file name separated by the front slash symbol - /. For example:
- static/style.css
- static/scripts/my-super-script.js
Variables you can use in the web page
You may use the following variables in the template:
- %static% — Path to Static directory. It may be useful to make references to CSS/JS files from the HTML page. For example: ◦<link rel="stylesheet" type="text/css" href="%static%/style.css">
- ◦<script src="%static%/script.js"></script>
- %link% — Base link of the scenario. Use it in navigation for constructing absolute URLs. If you don't want to use the automatically created links, you can use define the links yourself as well.
- %name% — Recipient's name
- %email% — Recipient's email address
- %message% — Error message (if any)
- ?track — If you want to track file downloads, add the "?track" parameter to the end of the file download URL.
- %redirect%: This is used to redirect users to an address on the internet after a successful attack. The URL has to be defined in the field "Redirect URL" in order to work. LUCY uses this in Hyperlink scenarios - right after the link in email was clicked, the user gets redirected to the address which you have specified in this field.
Editing Examples: upload your custom PDF in an existing template
Question: How can the files in a template be changed? For example, if I used the eFax template, how can I change the pdf to one that I created?
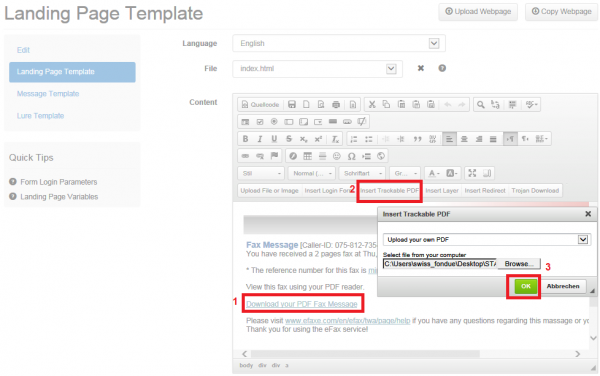
Answer: There are different ways to change that. One option is just to double-click on the link or button that contains the link to the file and then choose the upload tab to upload your own file. In case you want to upload a trackable PDF you could also use the quick editing buttons in the editor:
- Double-click on the link or button
- choose "upload your own pdf" and upload the desired file to LUCY
- then click "ok" and save the changes
Editing Examples: upload a custom image and link it to a word file with a macro
Question: How can I upload a custom image in a landing page and link it to a custom designed word file that contains a macro simulation?
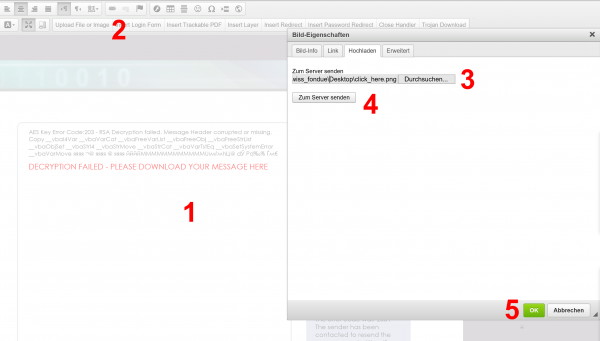
Use your mouse cursor to select the position in the template where you want to upload the image to (1). Click on the button "upload image or file" (2). This opens a popup menu with multiple tabs. Click on the 3rd tab "upload" and select the image which you want to upload (3). Click on "send to server" (4). After the image has been uploaded click on ok (5) to insert the image.
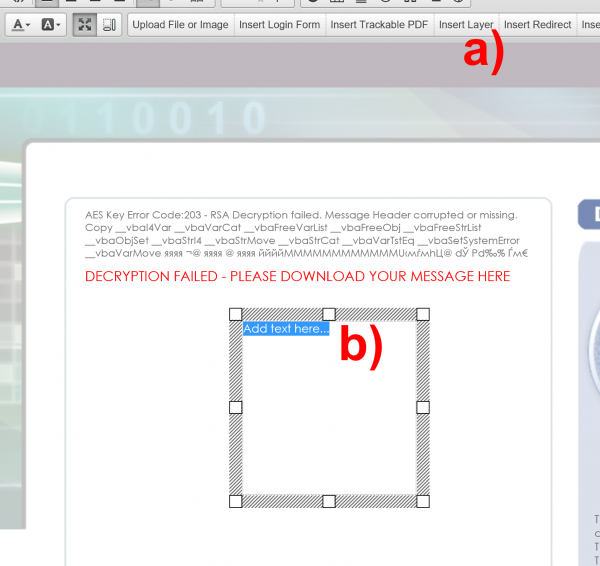
In case you cannot place the mouse cursor, you can also insert a layer (a). You can move the layer to the desired position and then insert the cursor where it says "insert your text" (b).
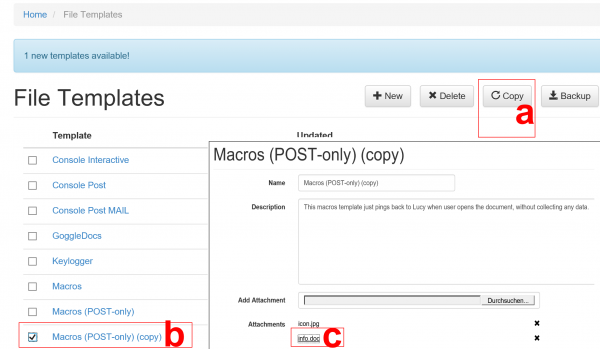
Now you need to link the image to the malware simulation. In case you use the standard malware simulations within the file template section you can click on the image, then on the link symbol in the editor and insert a link like this example: %static%/info.doc?track (for the file template "MACRO - POST ONLY"). The "?track" variable at the end of the link allows you to track the download of the file. In case you want to customize the malware simulation you first need to make a copy of the matching file template (a), then click on the copied file template (b) and download the according word file ©.
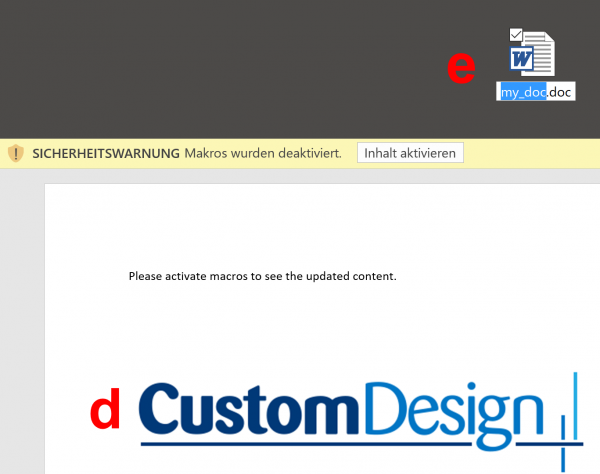
Now you can re-design (d) and rename (e) the file template. Make sure that the Macro is disabled during the whole opening & editing process:
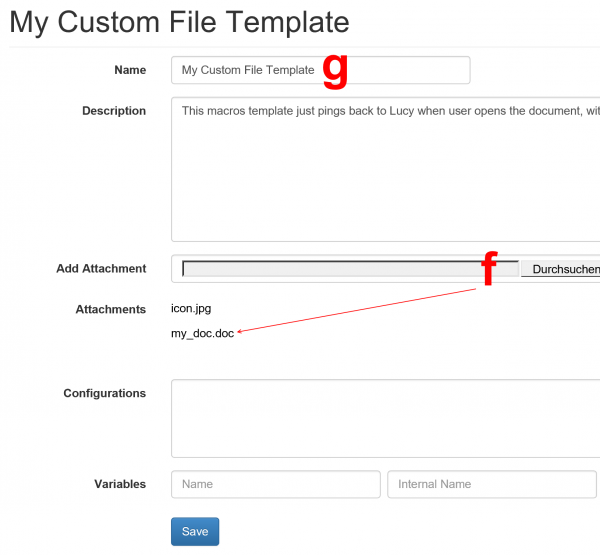
Once you are done, you can upload the customized file template back to LUCY (f) and give it a new name (g). Please save the changes once you are done.
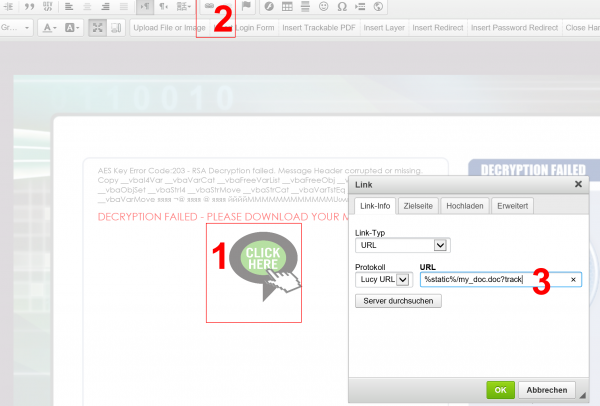
Next, go back to the landing page editor and select the image you uploaded (1). Now click on the button "link symbol" (2). Insert the link to the new malware simulation. In case the word file is called "my-doc.doc" the path must be "%static%/my_doc.doc?track" (3). Please press ok and then save the changes to your template.
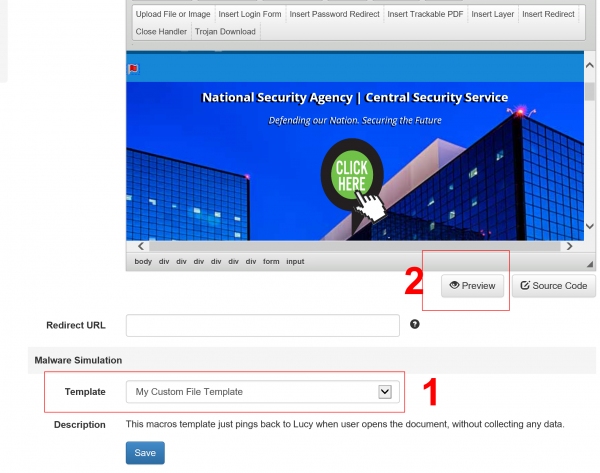
Please make sure that the malware simulation dropdown item points to your new custom malware simulation (1). If you preview (2) the template and test the download button, you should then see the custom word template being downloaded if you click on your custom image.

