Table of Contents
Edit the Basic Email Settings (message template)
The message template is a mandatory configuration element in all campaigns. In case you run a phishing campaign together with an awareness module you will need to define the message template in both modules (phishing & awareness).
Where to find the message template settings?
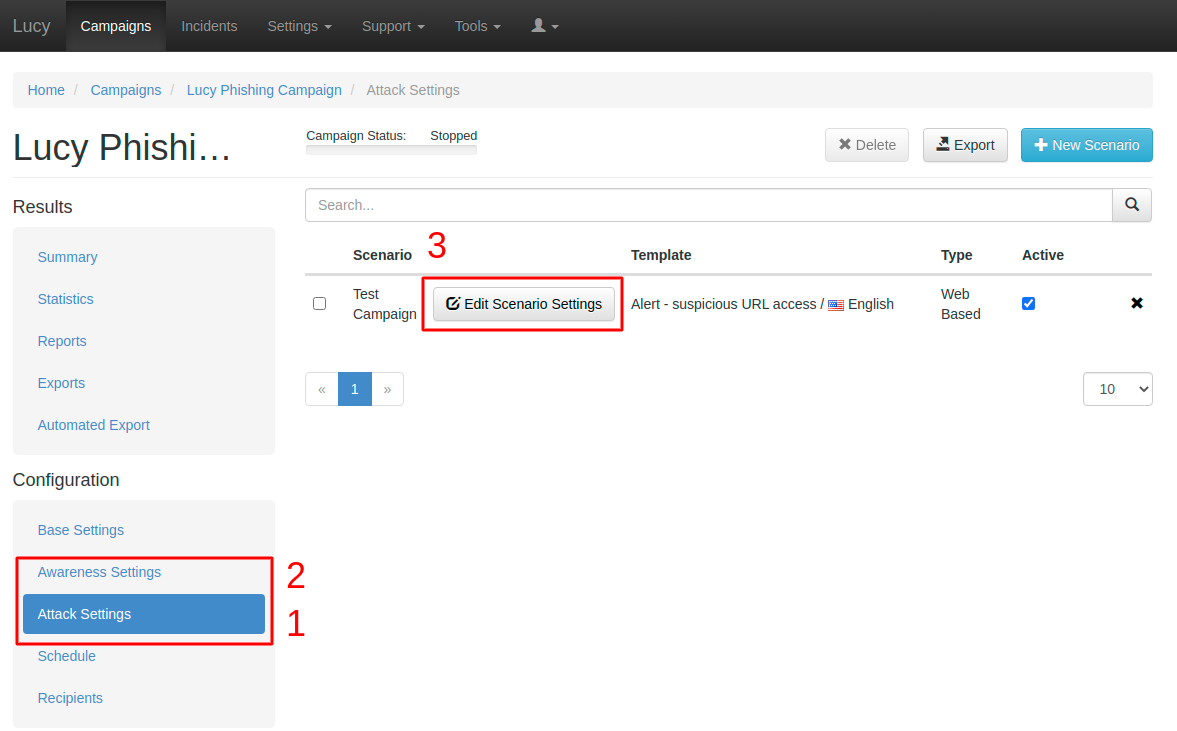
A campaign can have multiple scenarios. Each scenario - phishing or awareness- has its own Message Template. To configure the message template please choose the Campaign and navigate to Configuration → under the Attack (1) or Awareness (2) Settings –> select the Scenario template which you want to configure → Edit the Scenario Settings (3) → click on Message template/Email template:
Message template configuration
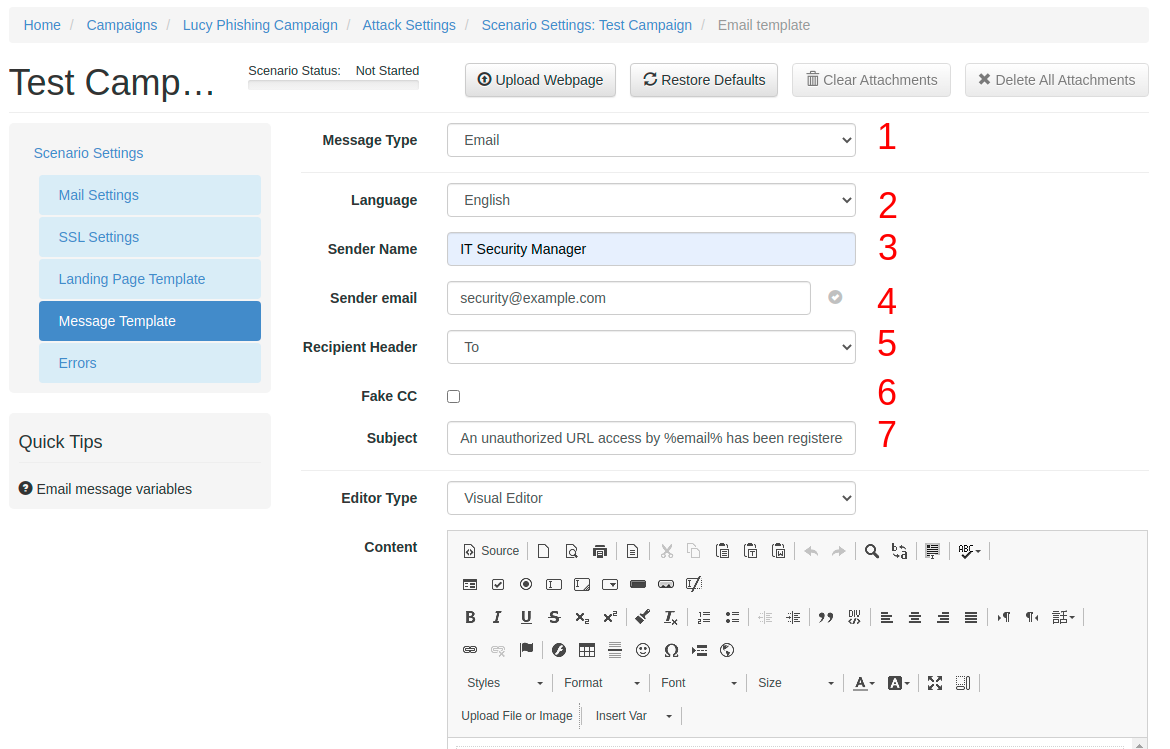
The message template is split into different configuration sections:
Choose your:
- Message Type (1): Email or SMS
- Сhoose the language (2) for each group. If you configured an English landing page, then select English also within that recipient group. If you have different groups with different languages within your company you can simply create a group and select a language for each recipient. LUCY then will direct each user to an individual landing page that matches that language.
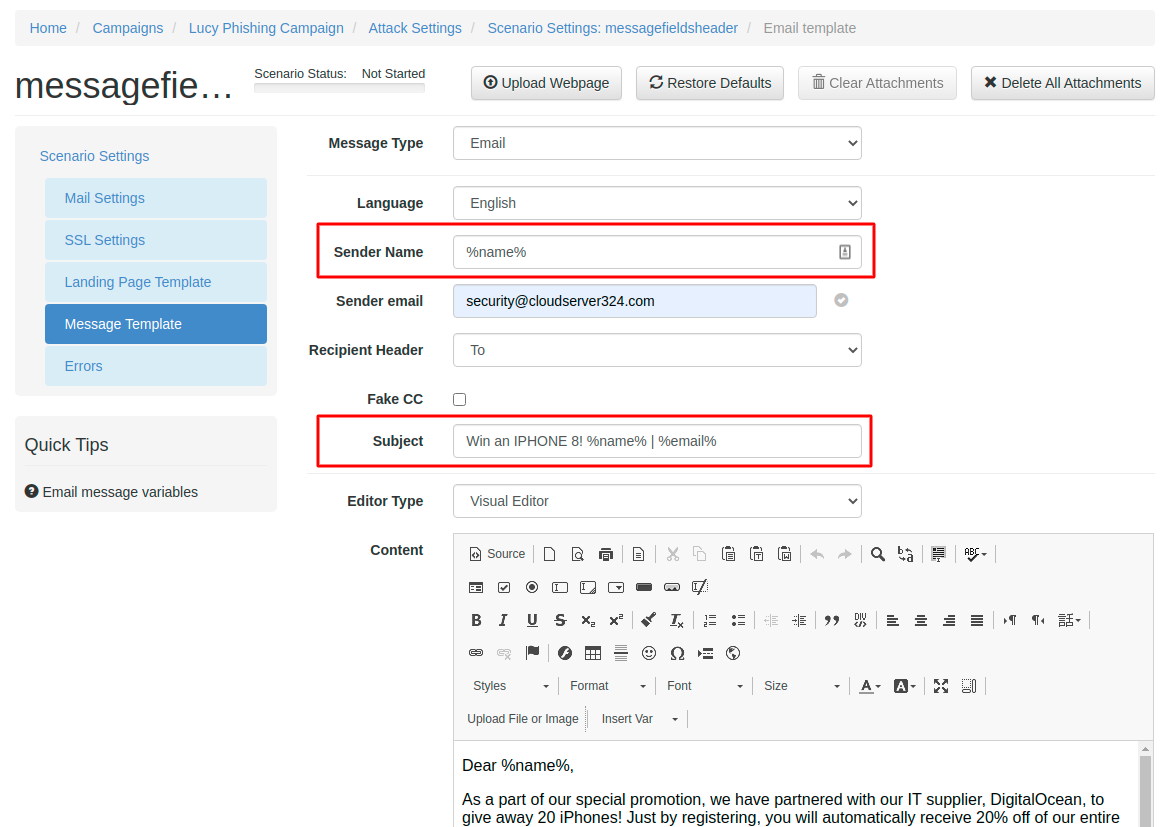
- Sender Name (3): The sender name equals the "from" line in the SMTP message header and it is only used for display purposes. You can just write a name in there (like "Jon Smith"). If you just want to display a different name together with an e-mail address, write the e-mail address with the display name in brackets as such: <Joe Example> joe@example.com.
- Sender Email (4) address: Note: The most common reason for emails not arriving at your Recipient's Inbox are SPAM filters. When using a known email domain like test@microsoft.com or a non-existing email domain like test@nonexistant.com, your email might get deleted by SPAM filters. Some public email providers are very restrictive and might not even forward emails to your Recipient's SPAM folder. To verify this you can use LUCY's built-in SPAM Checker.
- Recipient Header (5): Lucy also provides an ability to send all mails with fake CC or BCC.
- Subject (7): Create a Unique Subject Title In your e-mail header, include something unique to the recipient that's unlikely to be in a Spam message. Examples could include your company name, the name of one of your target's competitors, or the name of a person with whom the target is already familiar.
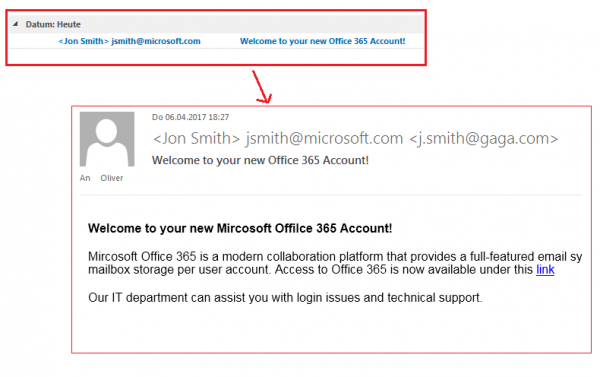
Q: Can I use any sender name? Yes - the sender name equals the "from" line in the SMTP message header and it is only used for display purposes. You can just write a name in there (like "Jon Smith"). If you just want to display a different name together with an e-mail address, write the e-mail address with the display name in brackets as such: <Joe Example> joe@example.com. Depending on your mail client the recipient might only see the name field in the mail preview. But in most cases he will see the real "MAIL FROM" address when he opens the mail:
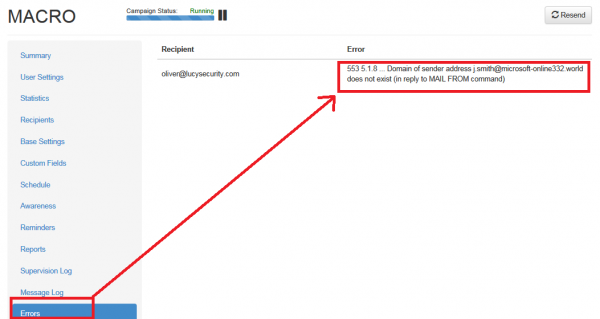
Q: Can I use any sender mail address? Technically you can spoof any mail address you want and LUCY will send the mail as you defined it in the sender field. But if you spoof a known email domain (e.g. test@microsoft.com) or a non-existing email domain (e.g. test@nonexistant.com) your email might get deleted or bounced by SPAM filters on the receiving mail server. In such a case you would see the error in your error log:
Solution: You can either
- Insert a mail sender domain that is NOT SPF protected (you can check here: https://mxtoolbox.com/spf.aspx) or
- Use a mail domain that is owned by you (see domain config) or
- Whitelist LUCY and the domains used in LUCY at the client side.
Please, also take a look at the legal aspect here: https://wiki.thrivedx.com/doku.php?id=legal_aspects_of_phishing_spoofing_etc
Add mail attachments in the message template
LUCY allows you to insert an image in an email within the message template:
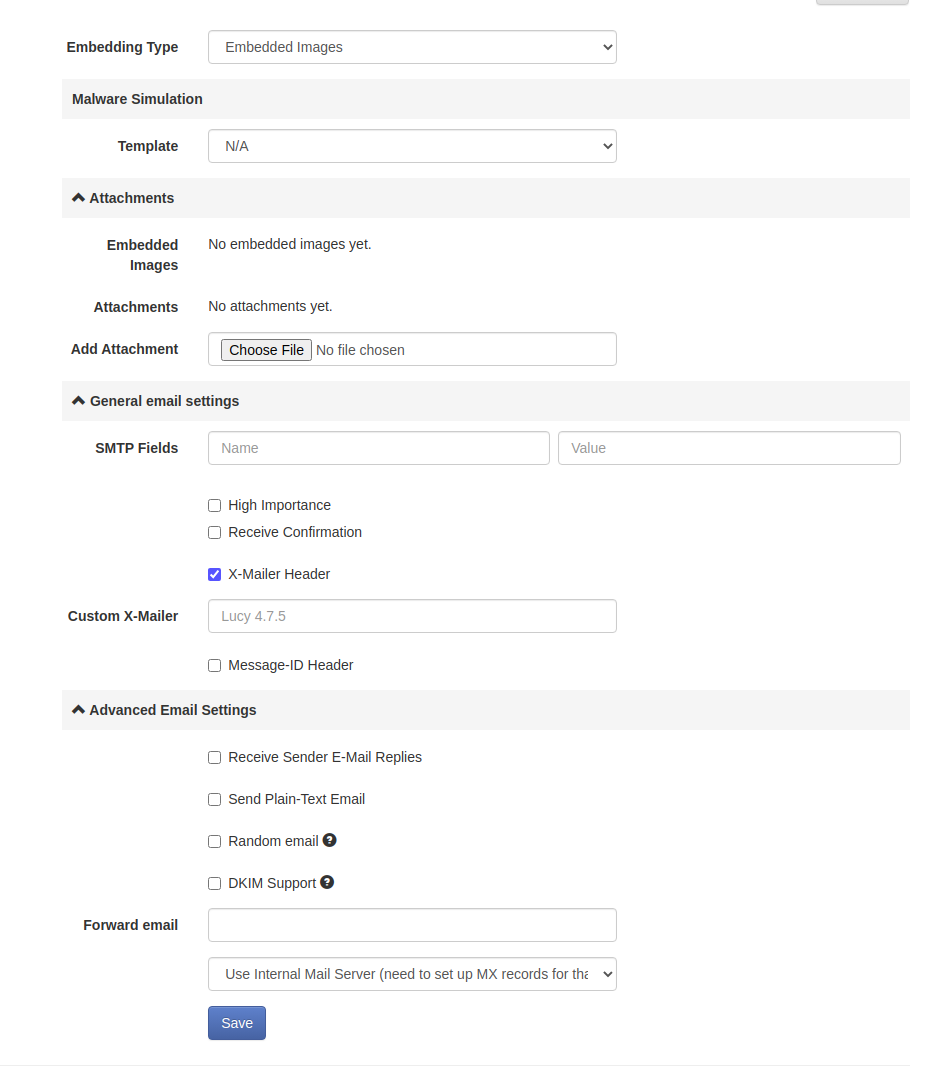
- You can choose between different embedding types: CID Embedded Images, Linked Images (on LUCY or externally). To find more information, please, consult this chapter.
- Malware Simulation: compile and attach a file-based malware simulation to the mail message. Learn more here.
- Attachments: upload your own custom attachment or payload
- General Mail Settings: define mail header settings
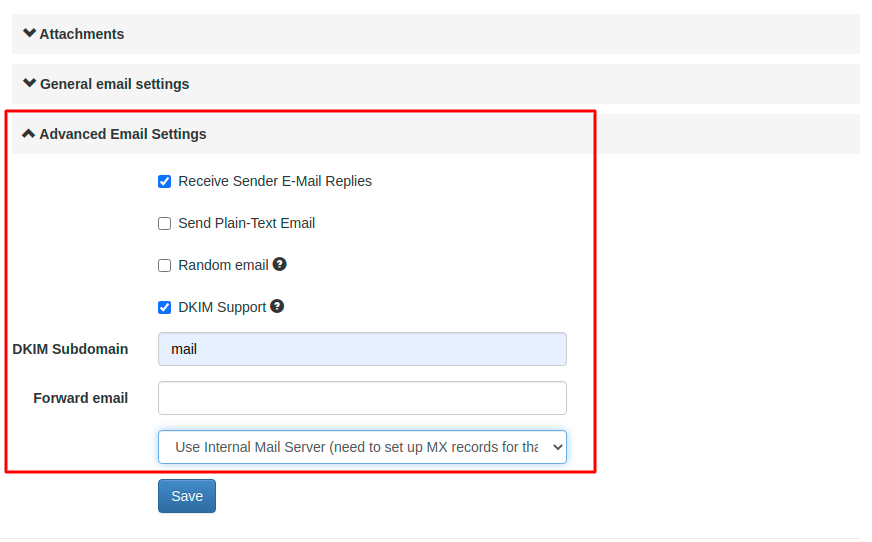
- Advanced Mail Settings: send mail as plain text, use an external mail service provider that creates a randomized mail sender, define a hostname for the mail server etc.
Creating the Link to the Landing Page within the message template (mail body)
Within the email, you will be able to place the link to the Landing Page (or awareness eLearning site). Each user will get a unique link (it might look like http://www.example-phishing.com/aea43bc8fa2a3dc78f987ed5db94ba1a1ff39ba13e9ed228f2c6eff73d787040) in their e-mail so LUCY will be able to analyze a recipient's clicking behavior.
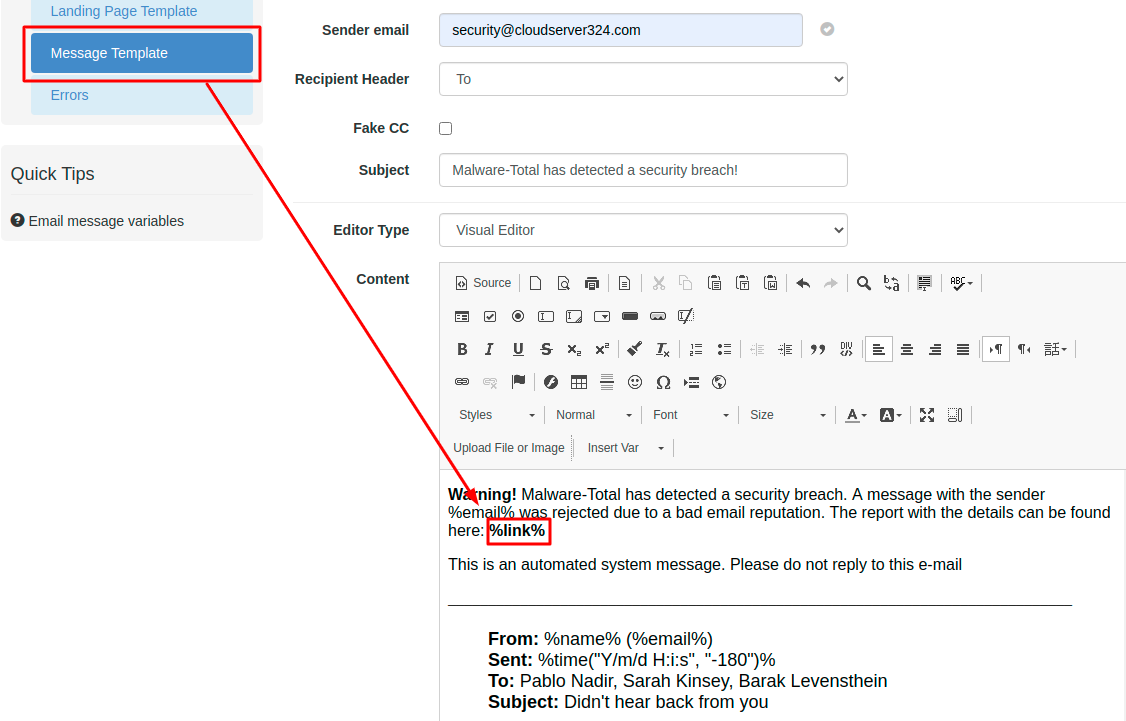
Alternative 1: Use the %link% variable in the text:
To insert that link, you can simply type %link% at the place where it should appear.
As a result, the user will get a mail containing the link that points to your Landing or Awareness page:
The link is dynamically generated:
- It will automatically add the http: or https: prefix (if you want an https prefix you need to enable SSL)
- It will automatically use the domain or IP in your scenario configuration (example: if you selected the domain "www.example.com" within the scenario settings, LUCY will create a link like "http://www.example.com/28shFG/"
Alternative 2: Hide the %link% variable behind a word
As a second alternative, you could also hide the randomized link and place the hyperlink behind a text, button, image, etc.
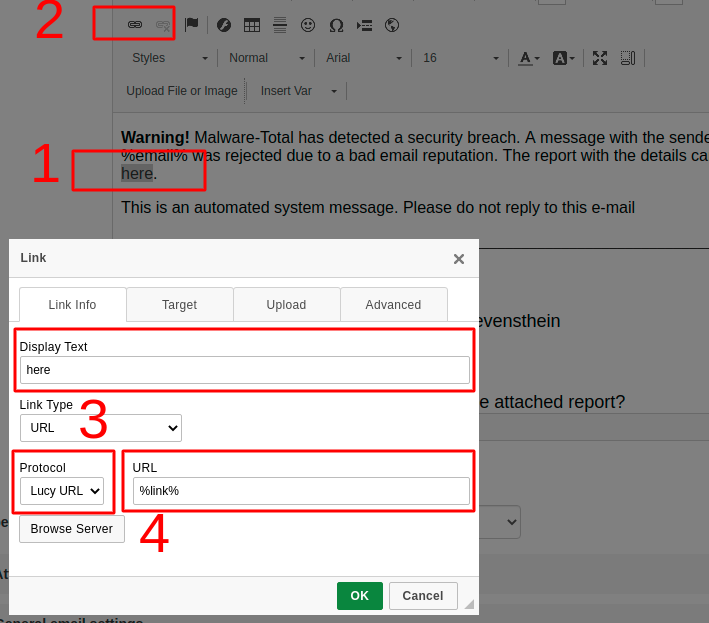
Example: Hiding behind text:
- Select the text which should contain the link (1)
- And then press the hyperlink symbol (2).
- This opens a pop-up where you need to define:
- Protocol (3): Custom (LUCY displays the hostname or IP of your admin UI.
- URL (4): %link%
- Then save the changes by clicking OK.
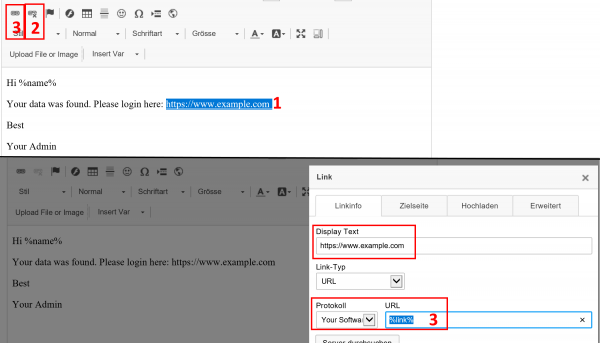
Alternative 3: Hide the %link% variable behind another link
Please, make sure the link variable is set in the HTML code if you hide it behind another Link. If you type a hyperlink instead of a word, the editor will automatically detect that, and create the link in the code. But this link will be wrong: If you type http://www.example.com in the editor, LUCY will automatically create a hyperlink to http://www.example.com in the HTML code (1) and underline the URL. But if you want http://www.example.com pointing to your LUCY URL, please remove the link pointing to http://www.example.com in the source code directly, or remove it by clicking on the "unlink" symbol (2), and then select the text "http://www.example.com" and click on the link symbol again and insert %link% in the HTML code (3).
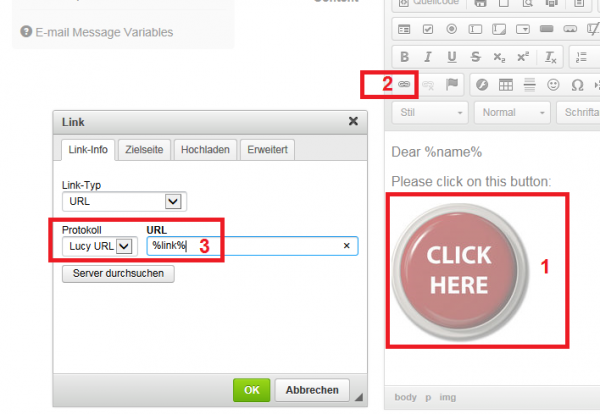
Alternative 4: Hide the LUCY link behind an image
- (1) Insert an image in the message template & click on the image (select the image)
- (2) Click on the hyperlink symbol
- (3) Insert the "%link% variable
- Save your template
Manual Link Creation
If you don't want to use LUCY's randomized URLs, you can also create your own customized links. You will still need to use the %link% variable in the email template. Regarding the recipients, you can define your own links that LUCY will use for the campaign. More info can be found here.
Automatic Link Creation with a shortened randomized string
As mentioned before LUCY will create a randomized URL with a string to identify the user (e.g. http://www.example-phishing.com/aea43bc8fa2a3dc78f987ed5). If you want a shortened randomized string because you feel that the long string might look suspicious to a user you can tell LUCY to use a short version under the menu Settings → Advanced Settings → Recipients:
Variables you can use within the message template
Lucy allows you to use multiple variables within the message template. The variables pull the information from the recipient in the associated group. The message variables may be used in the mail body and also within the mail header elements:
You may use the following variables in the message template:
- %link% — unique page URL for the recipient.
- %link-awareness% — link to awareness website. You should configure & enable awareness website in campaign settings for this feature to work.
- %name% — recipient name
- %firstname% — recipient first name
- %lastname% — recipient last name
- %email% — recipient e-mail address
- %division%
- %location%
- %staff-type%
- %comment% — recipient related information.
- %gender("MALE ADDRESSING", "FEMALE ADDRESSING", "NO GENDER")% — recipient gender
- %subject% — subject of the phishing mail
- %sender% — sender name of the phishing mail
- %sender-email% — e-mail address of the phishing mail
- %time(FORMAT, OFFSET, ZONE)% — Time based variables
More info about the time variable
- FORMAT - date/time format
- OFFSET - date/time offset in minutes, can be negative. Example: "-60" - means 60 minutes prior to mail submit time, "20160" - 20160 minutes = 14 days
- ZONE - time zone name. Example: US/Central
- EXAMPLES: %time("l, H:i", "0", "Europe/Zurich")% — will output "Monday, 09:20" - exact time of mail submission in Europe/Zurich zone | %time("Y/m/d H:i:s", "60")% — will output "2016/12/12 10:20:30" - 1 hour ahead of mail submit time
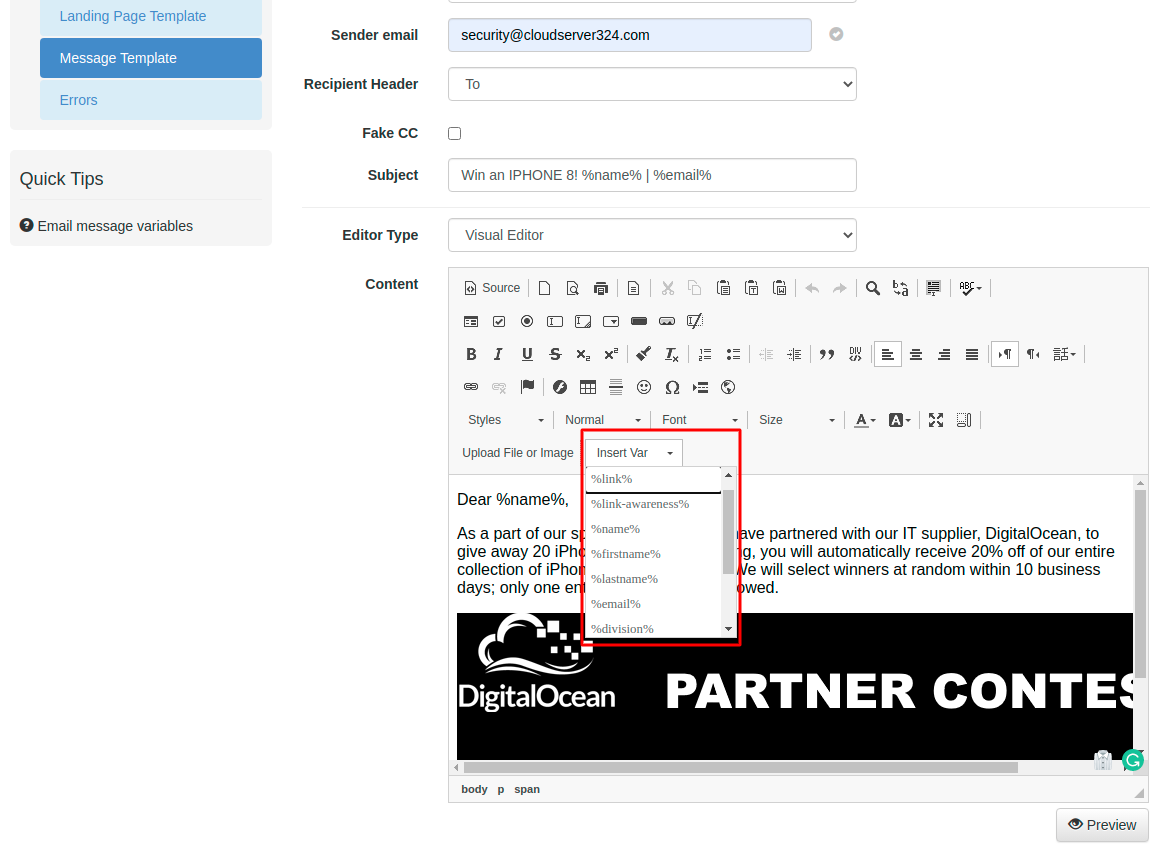
You can also use the dropdown in the message template to insert the variables at the right place:
Please note, that these variables are not available in CSS and Javascript files.
Embedding images
Within the message template, you can embed images. Please visit this chapter for your options.
Optional Email Elements
The email configuration page has some other Optional Elements:
- Random E-mail: LUCY will generate a random email account with a random sender for this single test. After the campaign is stopped the email account will be deleted.
- Use Reply-To Header: You might want to intercept email replies. If the user presses Reply, the email address defined in that Reply-to field will appear. It might be a different one to the original sender's email.
- Attachments: You can add your own attachments/payloads here. Please keep in mind that most attachment types (like executables) get filtered by common email clients.
SMTP Fields: Enables you to set a custom SMTP header. This can be useful in certain environments (e.g. to flag the phishing mail with a custom email header so the SPAM gateway can differentiate between real SPAM and LUCY emails).
Catching Email Replies
If you want to catch email replies you have three options:
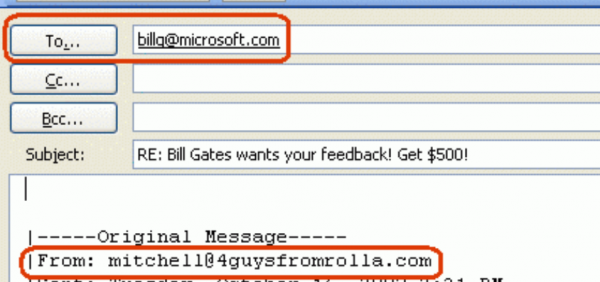
- (1) Define a Reply-to header. Please define that under the Scenario Settings → Message Template at the bottom under Advanced Mail Settings. The reply-to address is the address where email replies should be sent, instead of ‘From’. This is used if, for some reason, your ‘From’ address cannot receive replies (e.g. you do not control that domain or don't have a mail server setup for that domain). In the screenshot below you see that the email is sent from the user "mitchel@guysfromrolla.com". If the user clicks on the reply-to button in the mail, the actual reply-to address set in the header is used then (billg@microsoft.com). You should use a reply-to address that you can actually receive. Typically phishers use generic mail addresses from Gmail, Yahoo, etc.
- (2) Define a Forward Mail: LUCY is able to forward the Returning/Answering emails to an email address specified in that field. However, this requires a DNS entry (MX record) on a DNS server for the sender's domain that points to LUCY. Example: You send emails as attacker@phishing-test.com and LUCY’s IP is 201.35.77.12. Then you need to define an MX record like "phishing-test.com MX 10 201.35.77.12". Within the forward mail field, you can enter your own custom mail address (user@example.com). If a user replies to "attacker@phishing-test.com" LUCY will accept this mail and then forward it to "user@example.com" (note: most register services already offer free mail/DNS packages. So if you register a phishing domain you can already set up an email forwarder for that domain and you don’t need LUCY for that).
- Using a catch-all mail account for your registered domain that forwards to another mail address: If you registered the domain through LUCY you have the ability to define for one specific mail address one mail forwarder (see domain registration settings). If you want to have all mail addresses forwarded we can activate a catch-all account. This Email Forwarding feature will accept all email addresses on the provider side (using the provider's mail server) for a domain and forward emails to other email addresses of your choice.
Create a HTTPS link (use SSL)
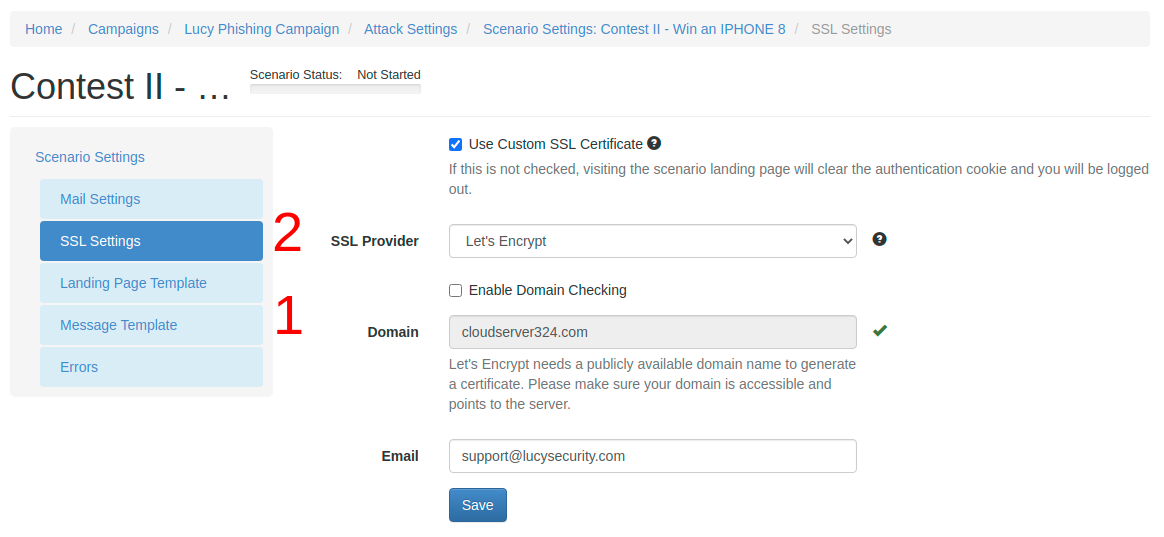
By default, LUCY will use an HTTP connection to your landing page. If you want the phishing or awareness website to be accessed via SSL, you first need to create the link in your Message Template (1) using the default LUCY variable %link%. Next, you need to click on the Scenario Settings. A submenu called SSL Settings (2) will open. Please enable the checkbox and create the certificate. LUCY will then automatically create an https link to your landing page:
Technical Background Info
Lucy uses the file under /etc/postfix/virtual.db for email forwarding, when you check "Forward emails to" checkbox in scenario's message settings. When you enable email handing feature in incident settings, Lucy adds email domain to /etc/postfix/main.cf, to the line with "mydestination" option, and that makes Lucy intercept all emails that arrive to emails on that domain.
Issues with Line Breaks in Outlook
It is possible that certain Outlook versions do not render line breaks correctly. So HTML tags like <br> or <p></p> do not work very often. A workaround is to use tables or to define a distance within a SPAN tag:
<p class="MsoNormal">
<span> </span>
</p>

