Table of Contents
PREPARATION
- Instance Type: The LUCY AMI requires at least 2 GB RAM for 1000 recipients or less, 4 GB RAM for 5000 recipients or less and 8 GB RAM for 10'000 recipients or less. The minimal HDD is 100 GB (recommended is 300 GB). Please find your instance type here: https://aws.amazon.com/ec2/instance-types/
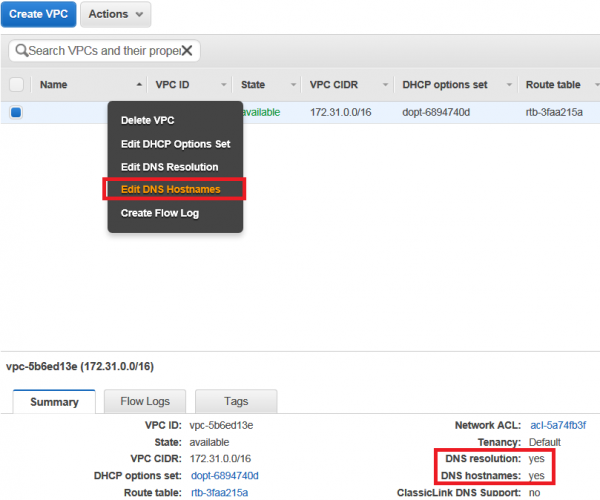
- VPS Configuration: You need to enable “enableDnsHostnames” in your VPC configuration in Amazon: http://docs.aws.amazon.com/AmazonVPC/latest/UserGuide/vpc-dns.html#vpc-dns-updating. Otherwise you will experience an apache configuration failure due to a missing IP address in /etc/hosts. If you start new instances you need to check your VPC configuration in https://console.aws.amazon.com/vpc/home to verify that this setting is enabled.
SETUP TUTORIAL
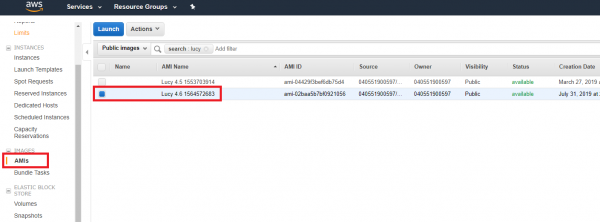
- STEP 1: Download the AMI Image: The AMI is available publicly via your Amazon account (use Ireland). In the AWS Management Console, open the EC2 Dashboard. To choose an Amazon Machine Image (AMI), select the Community AMIs tab on the left hand side of the screen and search by name "lucy" (see the screenshot).
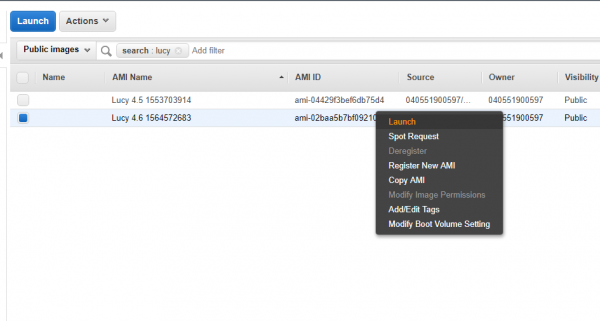
- STEP 2: Launch the instance:
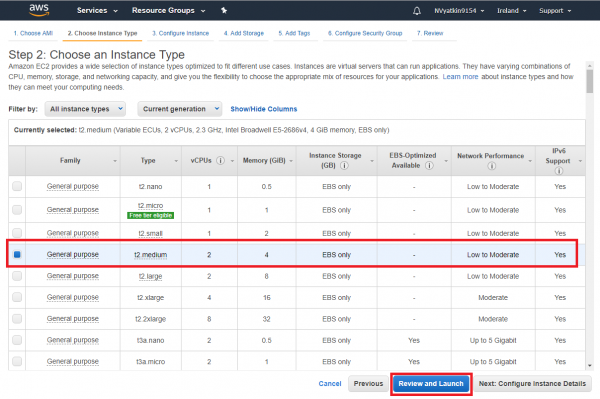
- STEP 3: Choose an Instance Type: there are many instance types available. Please scroll down to see them all. t2.medium matches with minimal hardware requirements.
However, if you are not planning to have more than 1000 recipients, t2.small will do as well.
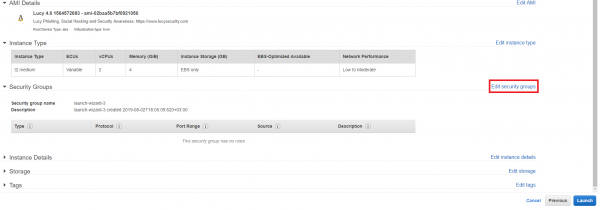
- STEP 4: Review Instance, Set Security group and launch: Click on "edit security group"
Make sure you have a security group associated with the instance that allows inbound SSH, HTTP, HTTPS & SMTP.
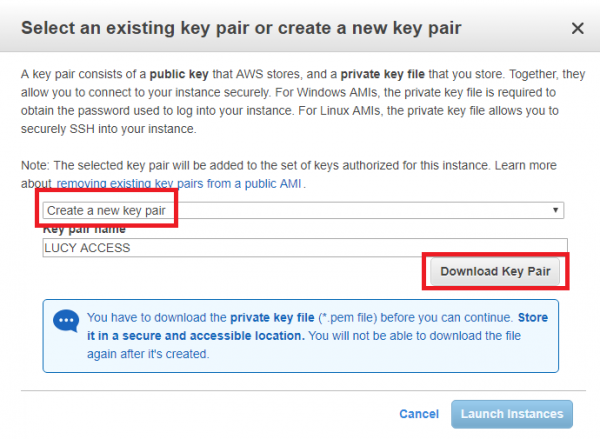
- STEP 5: Create a key pair to connect: Create a new public/private key pair for the SSH authentication and click "Download Key Pair".
Note: If you are connecting from a windows host you need to convert the PEM file first. You could use PuTTY with a private key to connect to your Amazon EC2 Linux instance. To do so go through the following steps described in this guide: http://docs.aws.amazon.com/AWSEC2/latest/UserGuide/putty.html
- STEP 6: Connect to LUCY via the public IP: After you have launched an EC2 instance, you can connect to LUCY’s public IP through SSH in order to configure the System. The public IP is visible as described in the screenshot below.
- STEP 7: login as admin: After the login type "sudo su" and press enter
- STEP 8: Start the image and initiate the installation script. If you already have a domain name for LUCY, please make sure that you specify it within the setup script as the certificate for the administration will be based on that domain name.
- STEP 9: Login to LUCY with a Webbrowser. Continue the setup in the browser using the credentials provided in the setup script. If you want to install a commercial version, please provide us with the workstation ID.
- STEP 10: Define your default mail delivery method in LUCY. In case you use the build in mail server: set the hostname for the mail server.
- STEP 11: Setup a domain in LUCY. This domain can be used for phishing simulations (landing pages) or the e-learning portal.
- STEP 12: Create a trusted certificate for the administration of LUCY.
- STEP 13: Create all the required administrators users in LUCY.
- STEP 14: Download all of the latest templates
- STEP 15: Update LUCY to the latest version
- STEP 16: Consider implementing additional security layers
- STEP 17: Give LUCY a custom branding
- STEP 18: Once you are all set you can try to setup your first campaign
Installation problem? Contact our support
In case you are planning to purchase LUCY or you are already a commercial client you can contact support@lucysecurity.com to open a ticket. We will get in touch with you within 24 hours.
Problems with sending mails within Amazon's environment
In EC2 environments we have clients reporting that there is a limitation in the amount of outbound SMTP traffic. The limit is 200 mails a day and 1 email per second.
More details here: http://docs.aws.amazon.com/ses/latest/DeveloperGuide/limits.html
Also, AWS does not support phishing simulations through SES as this is risky for Amazon public IP to get blacklisted. To avoid the limit and send not more than 200 mails per day, please use the Scheduler which helps to distribute the sending messages over a longer period of time.

